DIY for beginners series, we tackle screwing and drilling. Rachel Holmes explains the basics – and gets her hands on a power tool.
http://www.guardian.co.uk/lifeandstyle/house-and-homes-blog/2011/nov/16/toolbox-tips-drilling-fixing
Another cold November night, another trip down to the dark railway arches of Waterloo for a spot of screwing and drilling. Yes, it was the second class in my beginners DIY course. This week we were to learn all about which screw goes into which surface using which wall fixing – and finally get our hands on a power tool.
Back to the class on drilling and fixing. We started simple, with screws:
SCREWS
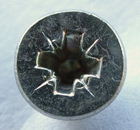 Pozidriv screw head.
Three main kinds exist for basic DIY: slot, Phillips (aka crosshead), and Pozidriv. Slot (-) and crosshead (+) are fairly obvious – their heads look like minus and plus signs. Pozidriv, however, I’d never heard of. Rather than try to describe it in words, I’ll let the picture do the work.
Each has a corresponding screwdriver. If you use the wrong one, or one that is the right shape but too small, you’ll notice shearing: small slivers of metal coming off your work. That’s a sign you’re wearing down the head of your screwdriver and screw. Shearing is less likely to happen with a Pozidriv screw and screwdriver, because there are more points of contact. Don’t buy cheap screws – they’ll wear down very quickly and be difficult to remove.
SCREWDRIVER BITS
Easy enough – the ‘bit’ is the end of a screwdriver. If you want to fix the slow way, then you can use normal screwdrivers. Otherwise you can buy screwdriver bits for ratchet screwdrivers, electric combi-drills or cordless screwdrivers. Magnetic ones are the easiest to fix into your (compatible) device.
RATCHET SCREWDRIVER
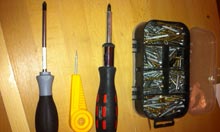 Screwdriver, bradawl, ratchet screwdriver and screws
This will save you from what I like to call ‘palm fatigue’; that blistering feeling from constantly moving the screwdriver handle around as you make the next turn. The ratchet screwdriver has a mechanism that allows continuous linear or rotary motion in one direction while preventing motion in the opposite direction. You can also get a ratchet offset screwdriver, which turns at 90° to the bit so that you can get into tight spaces.
CORDLESS SCREWDRIVER
We used a surprisingly small cordless screwdriver in the class. I confess to doubting their power at first, expecting a power tool to be a big, heavy beast of a thing. However, for doing fiddly little tasks, it turns out that a small cordless screwdriver is quite a handy tool. When using it, if you hear a woodpecker noise it’s the drill bit whipping around, bashing the inside of the screw. Make sure you have the right bit for the screw you’re using and that you’re putting enough pressure on the drill as you’re screwing in. This is a two-handed tool, so use one hand on the trigger and the other to add pressure. Remember, to unscrew you need to push just as hard as if you were screwing in.
DRILL
My dad said I should get a corded drill “because it’s more manly”. He’s had his for 16 years and, being resistant to change, thinks the batteries on cordless ones run out in 10 seconds flat. However, in 16 years technology has moved on quite a bit, and if you get a good drill this won’t happen. Go for a cordless one if you don’t want to faff around finding extension leads. Look for a lithium battery drill – an 18V one is a good choice for DIY. Think about what you’re likely to be drilling – if it’s going to include hard surfaces such as brick, you’ll need a hammer drill. If you have DIY mates, ask if you can try out their drills to get a feel for what you like and how easy they are to use. Or take a DIY class where you can try out different brands and sizes of drill.
DEPTH GAUGE
Lots of machines have depth gauges included so that you can drill to a specific depth. If yours has fallen off or doesn’t have one, you can always use masking tape on the bit to mark how deep you want to drill.
WHEN DRILLING
First, remember your safety goggles! Make sure your bit is fully secured in the chuck of the drill. Your drill should have lots of torque so it can turn at high speed or low. When drilling holes, move the drill in and out in one smooth motion with the drill running. Don’t stop halfway through and then try to yank out the motionless drill; you’re likely to snap off the bit. If you don’t want splinters on the edges of the hole you’ve drilled, clamp an off-cut of wood underneath and drill into that.
WALLS
Different walls need different fixings. A solid wall is made from brick, concrete or stone. A hollow wall will probably be a stud wall – a wooden, brick or metal frame with plasterboard panels on top. Some walls might be bits of both. You can either knock on them to find the solid/hollow bits, or you can use a stud finder: a battery-operated tester for finding studs and voltage (so you don’t drill through wires).
WALL FIXINGS
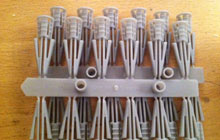
 A strip of Rawlplugs
Wall fixings are commonly known as Rawlplugs, although this is actually a brand name. You need these if you’re drilling things that are hard and won’t expand like wood – we’re talking plasterboard, brick, cement. The wall fixing will hold and grip your screw.
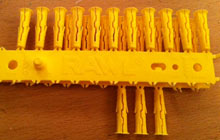
 A strip of plasterboard plugs
Different fixings do different jobs. A solid wall will need a bullet-shaped fixing, while a hollow wall needs one with wings (aka a plasterboard plug). All wall fixings are colour coded, and if you look closely at the strip there are etched indications of which screw and drill bit you need to use with them. If you’re unsure of what size hole/fixing/screw you should be using to hang something heavy or put up a shelf, err on the side of caution and go bigger.
DRILL BITS
Different materials need different drill bits. For drilling into a solid wall, you’ll need a masonry bit. It has a tip that looks like a Monopoly house from the side, and is made of super-strong tungsten carbide. A tile bit will drill through tiles; a twist or wood bit through wood. It’s a good idea to buy a set of drill bits that match the materials you’re likely to drill into around the house.
BATTEN/BATON
Many people think that you can’t attach heavy things to hollow walls. Not true. First, see if you can drill into a stud (the frame sitting behind the plasterboard). If not, then you can use a baton – a strip of wood screwed or possibly even glued (with grab adhesive such as No More Nails) to the wall to spread the load. Fix your heavy item to this strip of wood.
PILOT HOLE
A pilot hole is a useful thing to drill if you’re making a big hole. Use a small drill or bradawl to make a hole that guides the route for a larger drill bit or screw.
LIVE WIRES AND WATER
Fear of drilling into live wires is well founded. No one wants to end up as a spent human catherine wheel, spinning around the axis of the drill. Reassuringly, electricians these days have to place wires a certain depth into the wall. This is officially deeper than a Rawlplug. However, if your house is old these regulations may not have been in place when it was wired, so it makes sense to be extremely careful. Don’t drill directly above or below light switches and plug sockets. Invest in a stud finder/metal detector (as mentioned above) that will detect wires and pipes. If you do mistakenly drill into a water pipe, think of the little boy with his thumb in the dyke and LEAVE THE DRILL BIT IN THERE. Then turn off your water and call out a professional.
DRILLING TILE
The fear when it comes to drilling tiles is that you’ll crack or split them, but this is easily avoided with confidence and masking tape. First, attach the correct drill bit – you need a specific tile one. Second, put a few layers of masking tape over the drilling area. This gives the bit purchase and stops it skittering over the tile when you first apply it. Use quite a bit of pressure (but not too much), and be aware that it takes a while to get through the glaze, which is the hardest bit. You’ll be able to hear when the drill has broken through the glaze and is drilling the tile underneath.
http://www.guardian.co.uk/lifeandstyle/house-and-homes-blog/2011/nov/16/toolbox-tips-drilling-fixing