Creating PDF files with Nuance PDF Professional 7 PDF Create Assistant on Desktop@UCL
You can create PDF files using the PDF Create Assistant.
Before you start...
This guide is for computers running the following services:
- Desktop @ UCL
- Desktop @ UCL Anywhere
Note: Screen shots may differ slightly depending on the service you are using.
Instructions
This application allows you to create PDF files from one or more source files. You can:
- Create one PDF per file
- Combined files into one single PDF
- Overlay multiple files into one PDF document
To start the application
Desktop @ UCL
On the Desktop @ UCL Anywhere Citrix Receiver desktop, Click on the plus '+' button > Applications O-P > PDF Create Assistant. Select the application and it will pin to your StoreFront. Or
For the Desktop @ UCL Windows desktop click on the Windows Start button and then click All Programs and the select Applications O-P > PDF Create Assistant

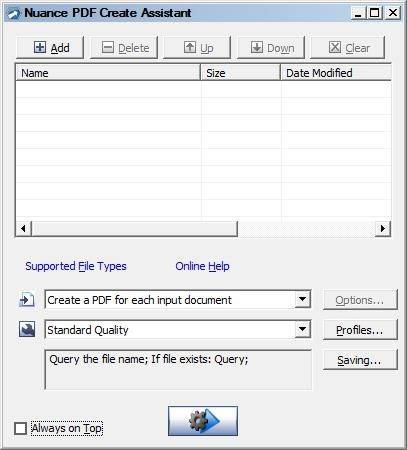
Fig 1. PDF Create Assistant window
There are several buttons and options on the screen, here is a summary of what they all do:
- Add button: Click to browse for files or drag-and-drop files from Window Explorer into the list area.
Fig 2. Add button
- Delete button: to remove selected files from the list. This removes the file link from the list, it doesn't delete the file itself.
Fig 3. Delete button
- Up and Down buttons: to re-arrange the file sequence in the list. Files will be placed in the PDF in the listed order if you choose to combine the files into one single PDF.
Fig 4. Up and Down buttons
- Clear button: to remove all the files from the list.
Fig 5. Clear button
- Assemble selection drop-down list: allows you to choose whether you want to:
Create a PDF for each input file Combine files into a single PDF or Overlay files
Fig 6 – Assemble icon
- Profile selection box: Select a profile which defines the output type or quality of the PDF document you create.
Fig 7. Profile icon
You can modify an existing profile or create a new one if necessary by clicking on the Profiles... (Manage PDF Create Profiles) button.

Fig 8 – Manage PDF Create Profiles
Managing and editing PDF Create Profiles
This screen will list all of the different PDF profile types such as:
- Standard Quality
- Draft Quality
- Publishing Quality
To edit a profile you should select the one you want to edit
You will then be provided with a number of options on the right side of the screen
Compatible with: It is advised leave this as the default (PDF 1.4)
Font Embed: You can select whether to Embed fonts in te document so that it will display exactly like the original document (this may increase the file size)
Compression: This determines the file size and quality of the document and ranges from level 100 (Large file size, highest quality) to level 0 (low quality with no images, but small file size)
Security: depending on the confidentiality of the document you may want to consider suitable encryption.
Watermark: Various Watermark options are available that you may want to add to your document
There are also a number of buttons at the bottom of the screen
New: creates a new profile based on the options selected
Delete: deletes the selected profile
Default: restores the default settings for that profile.
Creating PDFs
1. Once you have added the file/s you want for then click on Start PDF Creation button (or use the keyboard shortcut of Alt + G)

Fig 9. Start PDF creation button
1. You will then be asked to select a destination to Save the PDF document. By default in Desktop @ UCL this will be your My Documents folder on the N: drive.
2. Click Save and the PDF document will then be created and saved in the folder you requested.
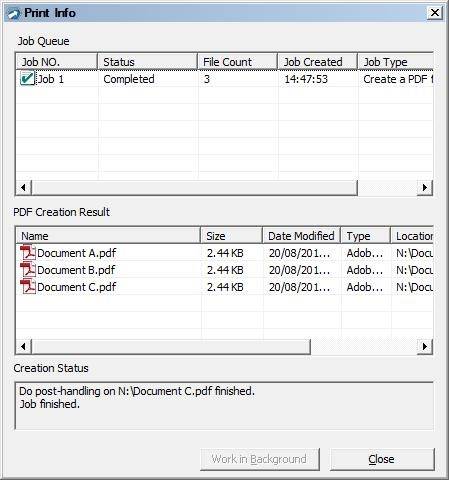
3. The Print Info dialog box will then appear, listing the input and output files and showing the conversion status. You can double-click any PDF name to view the created PDF.

Fig 10. Print info dialog box.
Related guides & other info
Help & Support
For further help and assistance you will need to contact the IT Services.
Feedback
We are continually improving our website. Please provide any feedback using the feedback form.
Please note: This form is only to provide feedback. If you require IT support please contact the IT Services Help desk. We can only respond to UCL email addresses.
 Close
Close

