Creating PDF files from Windows/File Explorer
This guide explains how to create a PDF from a file or group of files when browsing in Windows/File Explorer in Desktop @ UCL and Windows.
This guide is aimed at...
- Staff
- Students
- Visitors
- IT Administrators
- SLMS staff
- Researchers
Before you start...
- A computer running Desktop @ UCL or Windows 7
- If you are using Desktop @ UCL, you need to have logged into Desktop @ UCL PC or Desktop @ UCL Anywhere services
Instructions
Creating a PDF from one source file
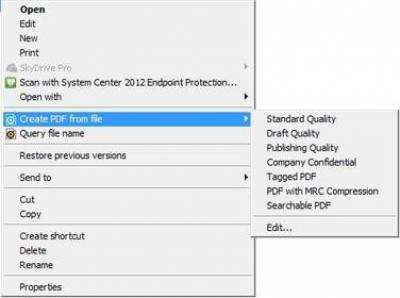
1. Right-mouse-click on a single file. You will see the following options:

Fig 1 – Create PDF from file options
2. Choose PDF output type from the list, Standard Quality is sufficient in most icases, but there are a number of different options. To customise one of these options of add a new one click on Edit... from the sub menu.
3. You will then be asked to select a destination to Save the PDF document. By default in Desktop @ UCL this will be your My Documents folder on the N: drive.
4. Click Save and the PDF document will then be created and saved in the folder you requested.
Creating a single PDF from a group of source files
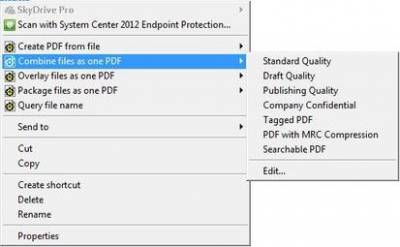
1. If you select a group of files, you will see that there are a different set of options available to you when you right click. For example, you can combine the selected files in to one singe PDF file:

Fig 2 – Combine files as one PDF options
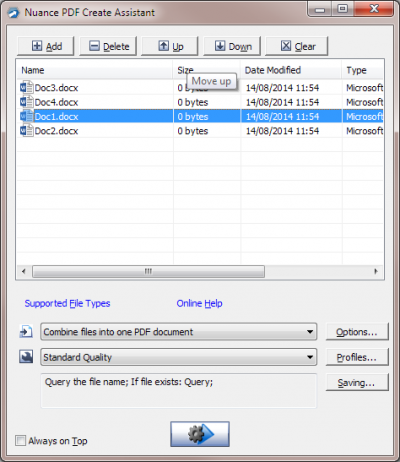
2. If you select this then the next screen will list the documents you have selected and you will have the option to reorder them. You can do this by clicking on a document in the list and then clicking on Up to Move the document up or Down to move the document down in the list. The order of this will determine what order they appear in the final PDF document.

Fig 3 - PDF Create Assistant window
3. Click on Start PDF Creation button (or use the keyboard shortcut of Alt + G)

Fig 4 – Start PDF creation button
4. You will then be asked to select a destination to Save the PDF document. By default in Desktop @ UCL this will be your My Documents folder on the N: drive.
5. Click Save and the PDF document will then be created and saved in the folder you requested.
Related guides & other info
- Creating PDFs in Microsoft Word 2013
Help & Support
For further help and assistance you will need to contact the IT Services.
Feedback
We are continually improving our website. Please provide any feedback using the feedback form.
Please note: This form is only to provide feedback. If you require IT support please contact the IT Services Help desk. We can only respond to UCL email addresses.
 Close
Close

