Double
in situ hybridization
By
Nigel Pringle (
There are at least two
chromogenic agents that can be used with good sensitivity (blue and magenta)
plus four fluorescent dyes (Fluorescein, Rhodamine, Cyanine 3 and Cyanine
5). Fast Red is another chromogenic
option but this seems to work well only for very abundant transcripts - unlike
most of the probes we deal with. Below I
have described the double in situ protocols as using either two chromogenic
reagents or two fluorescent reagents; however, combinations of chromogenic and
fluorescent agents work fine although it would be usual to develop the
fluorescence second as the chromogenic reaction product will obscure the
fluorescence if both probes co-localize.
The methods described below are extremely sensitive and have worked well
for most cDNAs we have tried, including some corresponding to rare mRNAs.
The magenta colour is
alcohol soluble and can be removed from your sections at any stage of the
process if required (important if showing doubles with co-localization).
Labelling Probes
You need two
differentially labelled probes - usually one labelled with DIG and the other
FITC (or biotin, which we have yet to try).
The FITC labelled probe is considered to be the least stable and is
usually recommended for the probe that is to be developed first. However, in our experience this does not seem
to be crucial. The overriding factor seems to be how highly each transcript is
expressed in your tissue of interest.
- Template DNA is prepared by linearizing the cDNA vector with the appropriate restriction enzyme(s). Usually we digest 10-20 mg of cDNA in 100ml. After 1-2 hours at 37oC a small aliquot is taken and run on an agarose gel to check that the plasmid is fully linearized.
- We have found the quality (and quantity) of our RNA probes is better if we phenol/chloroform extract the cDNA template prior to in vitro transcription. Add 1/10 volume of 3M Na Acetate to the template DNA and extract once with a equal volumes of phenol and chloroform/isoamyl alcohol (IAA) (24:1), then twice more with chloroform/IAA. Precipitate by adding 2 volumes of ethanol and leave at -20oC for approx 1 hour (or on dry ice until frozen). Spin down the pellet and wash with 70% ethanol and resuspend in TE (10mM Tris-HCl, 1 mM EDTA pH 7.5) at a concentration of around 1mg cDNA in 2.5ml.
- In vitro transcription reactions are set up at room temperature in the following order (keep all reagents RNase free!!):
- 2.5ml linear cDNA
- 4.0ml 5x transcription buffer (supplied with the polymerase)
- 6.0ml of 100mM DTT
- 2.0ml of 10x DIG RNA labelling mix (10mM each of ATP, CTP, GTP, 6.5mM UTP, 3.5mM DIG-11-UTP or 3.5mM DIG-12-FITC (Roche).
- 1ml RNasin (Promega)
- 20 units of the appropriate RNA polymerase
- H2O to make final volume 20ml.
- Incubate the reaction at 37oC for 2 hours. An aliquot (1ml) is removed and run on a DNA gel to check the RNA product (probe). It should look something like this:
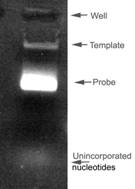
Occasionally the template is not visible (too little added) and sometimes you get double bands of probe, possibly caused by incomplete digest of cDNA, but the probes still seem to work fine. The example on the left is of a DIG labeled probe. If you have labeled with FITC then the unincorporated nucleotides are highly visible (as they fluoresce on the UV light box).
- Make the final volume of the labeled probe up to100ml with 10mM DTT and store at -70oC in small aliquots (5ml). Sometimes people remove the DNA template with DNase but we find this is not necessary. Many people add an ethanol precipitation step after the reaction, again we have found this to be unnecessary. We find that we often lose a significant fraction of the probe if we precipitate at this stage…so be warned that if you do precipitate you might need to reassess your probe concentration. In our hands (without precipitation) the optimal probe dilution is between 1:500 and 1:2000 and we routinely use 1/1000 as a "norm".
- We also make up our own DIG labeling mixture as this works out at about half the cost of buying in the ready-made solutions from Roche (see below)
DIG labelling mixture for in situs
Use chemicals from Roche - all are lithium salts,
Final concentrations of labeling mixture:
Roche catalogue number
10mM ATP 1
140 965 7.1ml
10mM CTP 1 140 922 7.1ml
10mM GTP 1 140 957 7.1ml
6.5mM UTP 1 140 949 4.6ml
3.5mM DIG-11-UTP 1 209 256 25ml
OR
3.5mM FITC-12-UTP 1 427 857 25ml
RNase-free water 20.5ml
(e.g. DEPC-treated)
final volume 71.4ml
Tissue preparation
There are various methods of tissue
pre-treatment. We prefer to fix tissue
in 4% paraformaldehyde in PBS. Usually
overnight at 4oC but for small pieces of tissue (e.g. young chick embryos
~E4) we fix 2-4 hours at room temp. In both cases this is followed by
cryoprotection in 20% sucrose in PBS, at least 24 hours at 4oC. N.B It is very important that this sucrose
solution is RNase free; we add diethylpyrocarbonate (DEPC) (1ml per litre),
shake vigorously until all the DEPC globules have disappeared then autoclave to
degrade the DEPC (breaks down into CO2 and ethanol) and to sterilize
the sucrose solution (turns yellow on autoclaving). After cryoprotection, the tissue is then
removed from sucrose and placed on a paper towel to remove excess sucrose,
before immersing in Tissue-Tec, usually in small foil boats made by wrapping
aluminium foil around the bottom of a suitable tube (we use disposable
spectrophotometer cuvettes). The foil boat
is filled with Tissue-Tec and the tissue placed in a suitable orientation for
subsequent sectioning. Make a note of orientation of specimen before freezing,
either by cutting a small notch in the top rim of the boat, or marking with a
felt tip pen (Tissue-Tec turns opaque-white when frozen). Rapidly freeze your
tissue by placing foil boat directly on to dry ice. N.B. if using a silicon mould (such as sold
for EM embedding) place some aluminium foil directly in contact with the
surface of the Tissue-Tec and place dry ice directly in contact with the foil –
to ensure rapid heat conduction.
An alternative method is to cut frozen
sections of unfixed "fresh frozen" sections and to fix them after
cutting sections. It is said that this
is more sensitive, but we have little experience of this method so cannot
comment. However, fixing in 4%
paraformaldehyde after cutting sections will require a proteinase
digestion (see below) to allow access of your probe to the RNA, so it is more
work.
Cutting sections
One could write a book about cutting good
frozen sections. Careful preparation and set-up of the knife and cryostat is
crucial - anti-roll bar parallel to top of knife, good sharp knife (check under
microscope for scratches) etc. We
re-sharpen knives ourselves with a soapstone and soapy water (holding the knife
in a commercially-available “sharpening back”).
Sharpen one side of the knife-edge more than the other so as to prevent
creating excessive bevel on both sides.
The knife angle (angle of the knife relative
to the cut face of the block) can make a significant difference to the quality
of the sections. We use 12.5o
(Bright cryostat) but the optimal angle varies from cryostat to cryostat.
Temperature is very important and the
temperature you choose will depend on many things, in particular the tissue you
are cutting. We routinely use -25oC
for the chamber temperature and -18 to -20oC for specimen
temperature (embryonic CNS tissue). In
general, if you are getting fracture lines along your sections you are cutting
too cold. If the front of your block
looks wet you are too warm. Play around
until you find the optimum conditions for your tissue. Also note that small adjustments to the
height of the anti-roll bar can have a significant effect on the quality of the
sections so play around with this first, before altering temperatures etc. When you change temperature give the specimen
about 15 minutes to equilibrate to the new temperature before going back to
cutting sections.
Sections can be cut as thin as 5mm, but for serial sections I usually cut around 15mm. The optimal thickness will depend on the nature of your tissue. Block faces can make a big difference to section cutting and there are many thoughts on design of block face. I prefer this shape \ / where the top and bottom of block are parallel to the knife-edge. Other shapes used are circles, squares and diamond shapes. If you have uneven edges on your block you will often struggle to cut decent sections.
After cutting sections and collecting them on silicon-coated glass slides,
let them air dry at room temperature. If
there are any bubbles trapped underneath the section (often happens on large
sections) they can be "burst" with the point of a needle, but do this
before the section dries out completely.
We do not perform any further treatments on
our sections. Under our conditions we
have found that proteinase K treatment of sections does not increase
sensitivity. However, if the sections
are post-fixed with 4% paraformaldehyde then proteinase treatment is essential
(this also applies to whole mounts and cell lines).
Hybridization
with digoxygenin-labelled probes
The two
probes - one DIG labelled the other FITC labelled - are both diluted (usually
1/1000) immediately before use in hybridization buffer (see below), denatured
at 75oC for 5 minutes and an appropriate volume (usually 150ml
per slide)
of diluted probe placed on each slide. The slides are coverslipped (with glass
coverslips, either oven baked at 200oC or straight from the box) and
hybridized overnight at 65oC.
Slides are
placed inside a sealed container with Whatman filter paper soaked in 2x SSC
plus 50% formamide. It is important to
include formamide otherwise the formamide in the hybridization buffer
evaporates during incubation.
Hybridization
buffer
·
1x "salts"
·
50% formamide
·
O.1mg/ml yeast tRNA
(phenol/chloroform extract the stock solution before storing)
·
10% (w/v) dextran sulphate
·
1x Denhardt's.
Make up a large
volume (100 ml will do around 1000 slides) with highest quality reagents and
water (DEPC-treated) and store in aliquots at -20o.
10x
"salts"
·
2M NaCl
·
50mM EDTA
·
100mM Tris-HCl pH 7.5
·
50mM NaH2PO4.2H2O
·
50mM Na2HPO4
Post-hybridization
washes
After overnight
hybridization, slides are incubated in MABT until the coverslips slide off (in
glass Coplin jars or similar). Washed a further three times (usually five
minutes each) in MABT before placing in wash buffer (1x SSC, 50% formamide,
0.1% Tween-20) at 65oC for 2 x 30 minutes (can be longer doesn’t
seem to matter too much). The slides are then incubated 2 x 30 minutes in MABT
(100mM maleic acid pH7.5, 150mM NaCl, 0.1% (v/v) Tween-20).
Post-hybridization
“blocking” of sections
The slides
are transferred to a humidified chamber and incubated in blocking solution
(MABT containing 2% blocking reagent -Roche, catalogue number 1 096 176) and
10% heat-inactivated sheep serum) for 1 hour at room temperature without a
coverslip.
Antibody
binding
Your choice
here will be determined by your choice of chromogenic vs
fluorescent probes (or a mixture) but will probably involve using Alkaline
Phosphatase (AP) conjugated anti‑FITC Fab
fragments from sheep (Roche, catalogue number 1 207 741) followed by AP conjugated
anti-DIG Fab fragments from sheep (Roche, catalogue
number 1 093 274).
Chromogenic
probes In the example below we first develop the
FITC-labelled probe to a blue colour, then develop the DIG-labelled probe to
magenta. Remember to include appropriate
controls such as omitting labelled probe from some slides, or omitting the
anti-AP antibody from others. This
controls for specificity and is required to show that killing the activity of
the AP enzyme before adding the secondary antibodies was successful (see
below).
Replace
the blocking solution with AP-conjugated anti-FITC antibodies (Fab fragments; Roche catalogue number 1-426-338) diluted
1:1500 in blocking solution, and continue the incubation overnight at 4oC
(or four hours at room temperature for strong signals).
Post-antibody
washes and colour reaction.
1.
The slides are transferred to Coplin
jars and washed 3 x 5 minutes in MABT, then 2 x 10 minutes in pre-staining
buffer (100mM Tris-HCl pH9, 100mM NaCl, 50mMgCl2).
2.
The pre-staining buffer is replaced with staining buffer
(100mM Tris-HCl pH9, 100mM NaCl, 50mM MgCl2, 5% (w/v) polyvinyl
alcohol (av. Mw ~100k) from BHD or FLUKA (we have had problems with some
batches from Sigma), 0.2mM 5-bromo-4-chloro-3-indolyl-phosphate (BCIP,
Boehringer), 0.2mM nitroblue tetrazolium
salt (NBT), both from Roche. These can be bought as liquids, 3 ml of NBT
catalogue number 1-383 221 and BCIP catalogue number 1 383 213, although we
routinely buy in BCIP (1 585 002) and NBT (1 585 029) as powder (for economy)
and make up as specified below.
3.
Incubate in the dark at 37oC until the signal
reaches a satisfactory intensity (usually a few hours to overnight, although
exceptionally they can be left over the weekend).
NBT stock
is 100mg/ml in 70% dimethylformamide- dilute 50ml
per 50 ml.
BCIP stock is 50 mg/ml in 100% dimethylformamide- dilute as above.
N.B Crucially
important is the inclusion of PVA. This
prevents the reaction product from diffusing from the reaction site and pushes
sensitivity up by approx 5-10 fold. We would
not consider developing the colour reaction without PVA present; it really
makes a big difference. However it is difficult to dissolve. To make a 10% solution in water place in a
water bath or oven at 80oC, keep shaking/ inverting the bottle for
approx 24 hours until you have a very viscous, clear solution.
We usually
make up a solution of 2x staining buffer, add the BCIP and NBT to this then add
an equal volume of 10% PVA in H2O.
Mix well before adding to slides and develop in the dark at 37oC
for as long as required. Depending on probes this can be between 4 to 8
hours. Occasionally slides need to be
left overnight.
When the
blue colouration has developed to your satisfaction wash slides in water.
Note, this
blue reaction product is stable in alcohol and xylene, but it does tend to fade
over a period of several months.
If you are
only performing single in situ’s then NBT/BCIP is the best colour reagent to
use, as it provides the best sensitivity. After development of the colour
reaction, dehydrate through an ascending alcohol series (30,50,70,90,100%
EtOh) for 30 seconds each followed by 2 x 2 minutes in xylene. Slides can then
be permanently mounted using by dropping some commercial xylene mountant such
as Xam (from BDH) onto the slides and covering with a glass coverslip. However if you wish to perform double in situ
hybridization do not permanently mount but proceed as follows.
Killing the first AP enzyme
There are two methods of killing AP - heating at 65oC or acid treatment. I use a combination of both to be really sure that the first AP is killed.
1.
Heat at 65oC in MABT for 30 minutes (or longer)
2.
Wash 2 x in room temp MABT
3.
Incubate in 0.1 M glycine-HCl pH
2.2 for 30 minutes
4.
Wash in MABT
Slides are now ready for the next antibody.
Second colour reaction - magenta
1.
Incubate sections for 1 hour in blocking solution.
2.
Incubate overnight at 4oC this time in
AP-conjugated anti-DIG Fab fragments (Roche,
catalogue number 1 093 274) diluted 1/1500 in blocking solution. Or 4 hours at room temp. In this case dilute
anti-DIG Fab fragments 1/1000.
3.
Wash extensively in MABT.
4.
Wash in pre-staining buffer.
5.
The pre-staining buffer is replaced with staining buffer
(100mM Tris-HCl pH 9, 100mM NaCl, 50mM MgCl2, 5% (w/v)
polyvinyl with the addition of INT/BCIP (Roche catalogue number 1-681-4600 for
3 mls) diluted 75ml in 10mls. I make
my own buying in INT (p- Iodonitrotetrazolium violet)
from Sigma (catalogue number I 8377) and BCIP p-toluidine
salt from Sigma (catalogue number B 8503) and dissolving both of them at
33mg/ml in dimethyl sulphoxide.
6.
Place at 37oC and allow the sections to develop
until a dark magenta colour forms. This
usually takes from a few hours up to 24 hours depending on the signal
strength. If leaving the reaction
product to develop overnight the stain often turns into a mass of crystals,
which can be annoying for taking photographs at high magnification. Unfortunately I’ve not found a way round this
problem, but changing the staining solution before leaving overnight seems to
help in some, but not all, cases.
7.
Wash slides before mounting with any non-alcohol/xylene
mountant (e.g 50% glycerol) and sealing the coverslip
with nail varnish.
 NOTE: This magenta colour reaction is alcohol soluble so be
careful. This is an advantage for doing
double in situ’s where the signals might overlap and you might wish to
photograph the first layer before removing it and developing the next (If this
is what you want then do the INT/BCIP colour reaction first, remove stain by
placing in ascending alcohol series (50,70,90,100% EtOH).
NOTE: This magenta colour reaction is alcohol soluble so be
careful. This is an advantage for doing
double in situ’s where the signals might overlap and you might wish to
photograph the first layer before removing it and developing the next (If this
is what you want then do the INT/BCIP colour reaction first, remove stain by
placing in ascending alcohol series (50,70,90,100% EtOH).
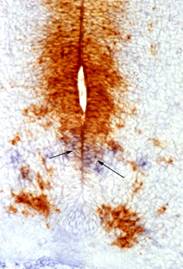
The example shown is of platelet derived growth factor alpha
(PDGFRa: blue, arrows) and PAX6 (magenta) in a mouse E12.5 spinal cord section.
Fluorescent in situ
hybridization using tyramide signal amplification
(TSA).
The TSA plus fluorescent systems use horseradish peroxidase (HRP) to catalyze the deposition of a fluorophore labeled tyramine amplification reagent onto tissue sections or cells. The reaction is quick (less than ten minutes….) and is almost as sensitive as NBT/BCIP.
The kits are available from PerkinElmer Life Sciences and comprise amplification buffer plus small tubes containing the fluorophore of choice that has to be dissolved in dimethysulphoxide (DMSO) before being diluting 1/50 in the amplification buffer just before use.
Protocol
- The protocol is almost identical to that used for the chromogenic reactions described above. The probes used are the same, either FITC or DIG labeled.
- The major difference is that instead of using AP-conjugated anti DIG or anti-FITC you use HRP-conjugated antibodies; either anti-DIG-POD (Roche, catalogue number 1-207-733) or anti-FITC-POD (1-426-346). The technical data accompanying these reagents suggest they should be diluted 1/100-1/200. I use 1/1000 for both of them with no discernable loss of signal strength and it also lowers the background (although you may need to play around with this concentration for your particular probes).
- Dilute the HRP-conjugated anti -DIG/FITC 1/1000 in blocking buffer and incubate overnight at 4oC.
- Wash 3x10 minutes in PBS containing 0.1% Triton x100 (or some similar non-ionic detergent - Tween 20 e.g.).
- Immediately before staining mix TSA kit components together, this is a 1/50 dilution of the fluorescent tyramide (dissolved in DMSO) into the amplification buffer provided. Add 100mls per slide and place a coverslip over each slide.
- Incubate for 10 minutes at room temperature. I have found that longer incubation times (3 hours and overnight do not develop any higher signal than is achieved over the first 10 minutes (although this may be worth re-checking if you have a particularly weak probe).
- Wash and examine under a fluorescent microscope.
Killing HRP enzyme
- Incubate slides in 3% H2O2 in PBS for 30 minutes at room temperature.
- Wash and block with blocking solution for one hour before
adding your second HRP-conjugated antibody. Don’t forget to include some controls
where either the second probe or second antibody is omitted so as to
control for specificity of the second layer colour reaction. i.e. did you really kill off the entire activity of the
first enzyme! And proceed as above.
Four different TSA Plus kits are currently available from PerkinElmer Life Sciences INC currently (June 2001) they cost £193 for 50-150 slides.
Fluorescein catalogue number NEL741 (50-150 slides) NEL741B (250-750 slides).
Rhodamine catalogue number NEL742 (50-150 slides) NEL742B (250-750 slides).
Cyanine 3 catalogue number NEL744 (50-150 slides) NEL744B (250-750 slides).
Cyanine 5 catalogue number NEL745 (50-150 slides) NEL745B (250-750 slides).
For an example see Pringle et al (2002) Development 130, 93-102 (Pdgfra and Fgfr3). Note that we find the fluorescent probes give a rather “spotty” image that is less suitable for high-magnification (subcellular resolution) micrography.