Shelx
Shelx is a least squares refinement program that is particularly good for refining higher resolution data (generally better than 2.2A). The program is written and looked after by Prof. George Sheldrick's group at the University of Gottingen, and it's website can be found here.
Preparing input files
1) Reflection file: Shelx cannot read the ccp4 mtz reflection file format, so you need to change this to an ascii "hkl" file. In order to do this you need to run the program "sftools" to get rid of the extra columns in the mtz file, and then "mtz2various" to convert the file format. Although this can be done from the ccp4i GUI, there are quite a few bugs so it is much easier to run these programs at the command line. Instructions can be found here.
2) Preparing your input (pdb) file.
Making sure your pdb file (from your molecular replacement) is in the directory you are working with, type:
setshelx
shelxpro
and then select option G (Generate PDB file from .res or .pdb) in order to create a form of the pdb file that shelx will read.
At the next few prompts you will need to type P to select read a PDB file, type the pdbfile name at the next prompt, Y to replace B values, Y to remove hydrogens, Y to remove disorder, N to keep all residues, K to keep water, your space group specific information - eg 4 molecules (asymmetric units) per cell if p222, and then the file name "shelxready.pdb" for the output file and the name of your protein.
The next section asks about selecting chains. If you have two chains (say A and B) type A at the first prompt, follow the defaults, and then type B when it asks you to input another chain. When you have entered all your chains in this way press enter and you will be returned to the shelxpro menu.
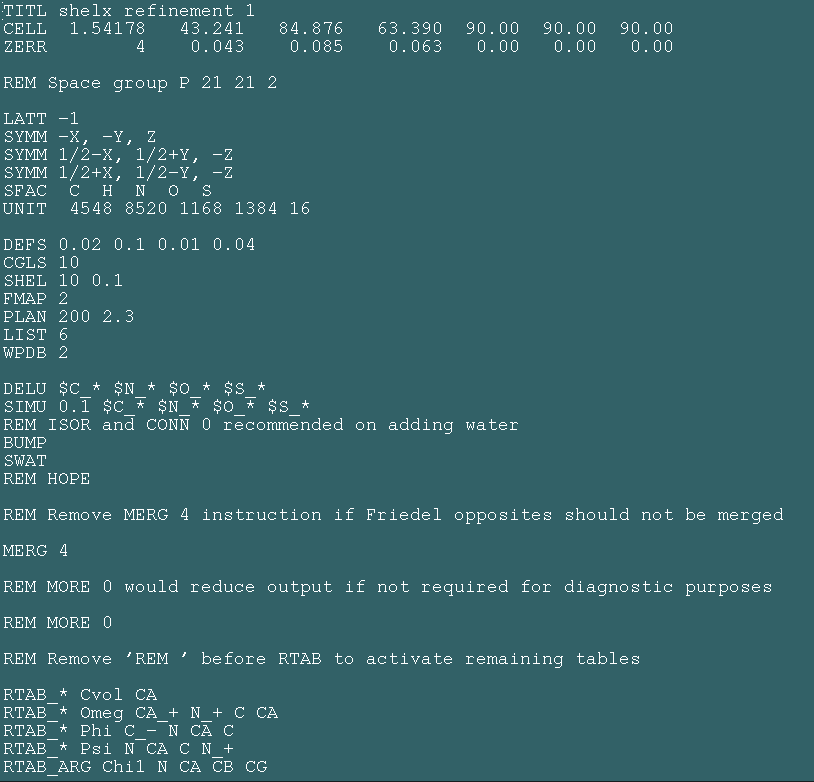
Now you need to convert your new pdb file (called shelxready.pdb) into "shelxpro.ins" needed to run shelx. To do this type I at the shelxpro menu followed by enter, accept the default output filename (shelxpro.ins), type in shelxready.pdb at the next prompt, type a title for your file (eg shelx refinement 1), make sure your cell coordinates, number of molecules per cell, space group and wavelength are correct (hit enter to accept), select C for scaling, and then the defaults for the offset (shelx uses the numbers 1000, 2000, 3000 etc. instead of letter chain IDs). Just hit enter to accept the next few options until it asks "HKLF code (3 for F, 4 for F-squared). As you are using F's (selected in the sftools step above) make sure you type 3 at this prompt (THIS IS VERY IMPORTANT!). It should then tell you that the file has been written succesfully. Press enter to get back to the shelxpro menu, and then Q to quit.
Next you need to open shelxpro.ins in a text editor and change a couple settings:
Using the text editor go to the "CGLS" line and change it to read:
CGLS 10 -1
The 10 tells the program to do 10 cycles of refinement and the -1 makes sure it calculates the Rfree set. Next go to the SHEL line and type in your resolution (eg if I have data from 50 to 2.2A I would change the SHEL line to read:
SHEL 50 2.2
Once you have made these changes save the file (as shelxpro.ins) and then close the text editor.
Running Shelx and checking the results
To run the program type:
setshelx
shelxh shelxpro > shelx.log
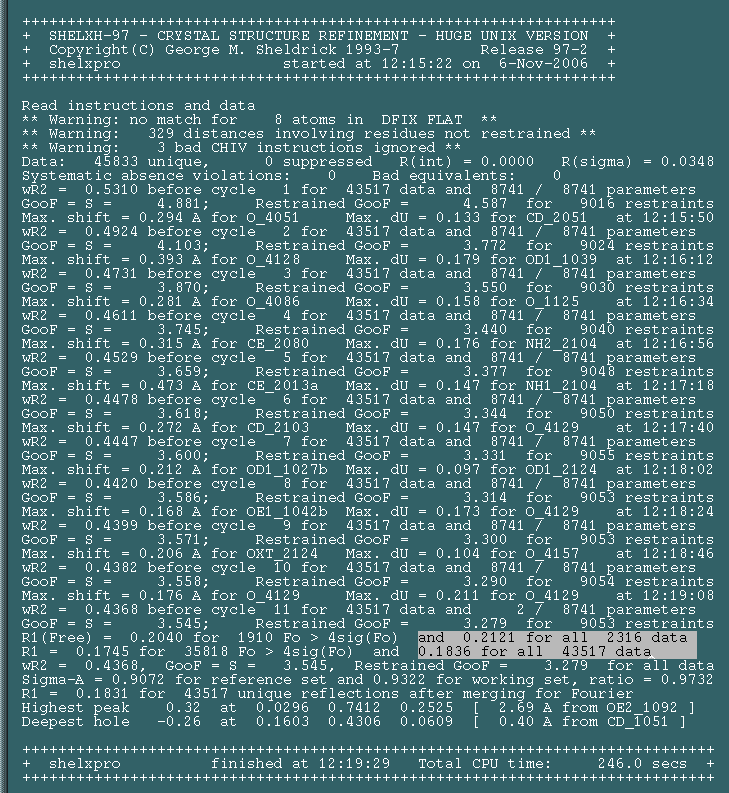
Shelx takes quite a lot longer to run than Refmac although this depends a bit on the machine you are using. Once the program has finished (the prompt will return to normal) you will see the following files in your directory:
shelxpro.res, shelxpro.lst, shelxpro.pdb, shelxpro.fcf and shelx.log
Open shelx.log in a text browser and scroll to the very bottom. This file reports on the progress of the refinement. If you scroll to the very bottom you can see your final R and Rfree value highlighted:
Making Maps
Once the program has run you can generate maps for viewing in a graphics package. To do this type:
shelxpro
m (Map file for O from .fcf)
Accept the defaults until you get to "Fourier type ...." As you want sigma weighted 2Fo-Fc and Fo-Fc maps you will need to run this procedure twice, selecting the appropriate type of map at this step. First time round type -2 to select your 2mFo-DFc map and then accept all the defaults. It will take a few minutes to generate the map (the prompt will apparently hang-up after saying something like "A 19MB scratch file will be created..." however you should then get an "Electron density histogram" and the prompt "<Enter> to continue. Press enter and then repeat this step but selecting -3 as the fourier type. Once you have done this exit shelxpro and check to make sure you have the files sigmaa.map (your 2Fo-Fc) and sigmad.map (your Fo-Fc) in your directory.
To convert these map files into the "ccp4" format for a program such as Coot, you need to use the mapman program from usf and type the following commands:
usf mapman (to open the program)
re m1 sigmaa.map omap
re m2 sigmad.map omap
no m1
no m2
wr m1 2Fo-Fc.map ccp4
wr m2 Fo-Fc.map ccp4
quit
Refining Ligands
Ligand coordinates can be generated using PRODRG2 (described here) along with the necessary shelx library files. The best thing to do is to save your new library as ligand.txt. Next you will need to build your ligand into your model using a graphics package, and then save your protein and ligand as the same pdb file. Then you need to make your shelxpro.ins file as described above, with the only difference being that shelx will warn you that there is a ligand in the pdb file that it does not know about. All you need to do is edit the shelxpro.ins file and then cut and paste the text from PRODRG2 just underneath the libraries for the amino acids:
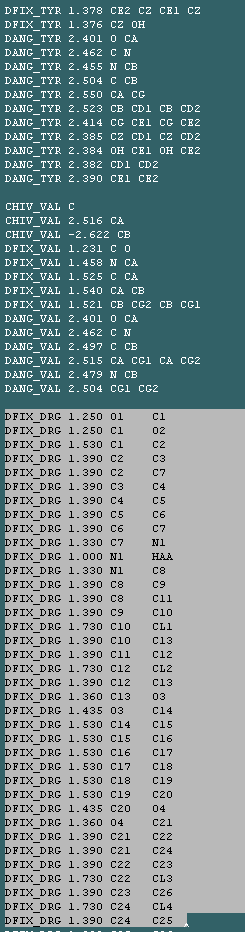
In this case "DRG" represents the library for my drug.