Close
Close

The Good Video guide
No matter the format, all good videos have the following in common:
- A plan: one that defines the aim, the audience(s), the key messages and the tone of the video.

- High quality picture and audio.
- Well edited with simple cuts and transitions.
- Clear UCL branding.
- Inclusive and accessible to those who are hearing impaired (subtitles) and/or vision impaired (audio descriptions, colour and text choices etc.).
- Video is planned and responds to what your audiences want to see and hear.
- Your Call to Action is made clear to your audience.
NB: Quality over quantity – your audience will appreciate one high quality video over five or six poorly executed ones.
See below for full details.
- TYPE - Purpose and types of video format
Once you know the purpose of your video, you can decide on what style of filming you would like to do.
One-on-one interviews
- The classic format.
- All about the conversation.
- Personality led.
- Host/presenter is key and leads the discussion.
- Focus is on the guests.
Round table discussion
- Works across any subject matter.
- Allows for great interplay between the host and guests.
- Creates a community feel.
- Reactive format.
Narrated storytelling
- Single voiced.
- Technically less challenging.
- Works well with storytelling, describing things.
- Music, clips, and archive go a long way.
- Time consuming script writing.
- Works best for specialised subject matters.
- LENGTH - How long should my video be?
The purpose of a video is to inform. But to successfully share information, first we have to capture and then hold the audiences’ attention. Content creators now have to create video that can compete with other distractions and the dwindling attention spans of audiences. In fact, 56% of all videos published in the last year are less than 2 minutes long.
This useful guide taken from a HubSpot infographic breaks down the ideal lengths of videos for social media platforms. (This is subject to change as technology and social media platforms develop)
INSTAGRAM - Why 30 seconds?
HubSpot discovered that Instagram videos that received the most comments averaged 26 seconds. Our brains process visuals 60,000 times faster than text, so we scroll other faster on it than any other app. Keep your videos brief, so they fit user expectations.TWITTER - Why 45 seconds?
HubSpot calculated that Twitter’s #VideoOfTheDay averaged 43 seconds. Twitter users are accustomed to short updates, like a 280-character tweet. The platform’s innate brevity also applies to videos. It’s best to keep them short.FACEBOOK - Why 1 minute?
HubSpot’s Facebook audience engages the most with 1-minute long videos. Users like watching snappy videos that they can quickly like or share before scrolling down to the next piece of content.YOUTUBE - Why 2 minutes?
HubSpot sees most engagement on videos that are about 2 minutes. Users like spending time on Youtube because they can easily find specific videos or watch their favourite YouTubers’ content. Creating longer in-depth content is perfect for the platform.NB - Longer videos still have their place in your arsenal of marketing tools. You just have to make sure you have a well designed brief so you know the purpose of your video and where it will be best placed.
- QUALITY - How to produce a good video
Here are some useful guidelines on how to create a good-looking video that your audience will want to watch. See below for guidance on background, lighting, camera angles, video frame, audio and sound, landscape/portrait, and other FAQs.
- 1. background
Decide on your background:
- If you’re filming at home, the easiest go-to background is a tidy bookshelf or a wall with some artwork.
- A plain wall can appear boring so do avoid if possible.
- A cluttered background is similarly problematic.
- Try to avoid too many bright colours in the background.
- Non-cluttered background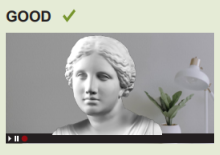
- Some decoration in the background but not distracting- Background looks cluttered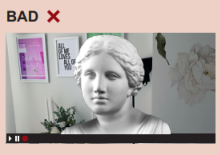
- Too many colours and text = distracting for the viewer
- Removes focus from person in the frame/shot- 2. lighting
Follow these tips:
- Natural light is always best.
- Facing toward a window can provide great natural light.
- Never film with a window behind you as you will appear in silhouette.
- If using artificial light sources (e.g. overhead, lamps or specialist lights), please make sure the light falls on you and not the background. This will ensure you remain the focus.
- Avoid any lighting from below your face or only on one side as this will create hard shadows.
Side lighting
- This lighting is OK but could better
- Half the subject’s face is in shadow and they don’t look clear on camera
- Details are harder to see including expressionsOverhead lighting
- This lighting isn’t ideal
- Some hard shadows on the face and not evenly lit
- Shadows on the subject’s face will move when they doDiffuse bright lighting
- This lighting is great
- The subjects face is fully visible and well lit
- They are in full detail and the light looks natural
NB: Before you begin speaking hold up a clean sheet of white paper. This will allow the editor to tweak the ‘white balance’ in post-production.- 3. camera angles
Where should you look when recording?
- Do raise your computer or webcam to head height so that you look straight at the camera, not down or up towards it.
- Please look and speak directly towards the camera lens and not at the screen. Looking into the camera lens when speaking allows viewers to feel like you are talking directly to them.- Camera angle is upwards
- Eyes are up and not towards camera lens- Camera angle is downwards - Eyes are looking at the screen not the lens
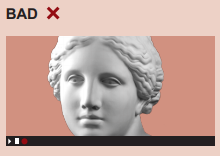
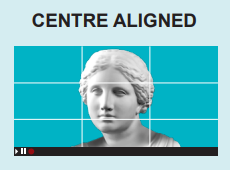
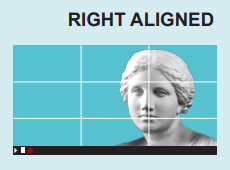
- 4. video frame
Where should I sit in the video frame?
Follow the Rule of Thirds. This is a commonly used guideline for helping with composition in photography and videography. The basic principle is to divide your image into thirds horizontally and vertically. These lines and their intersections act as guidelines for where to position yourself in the frame.Below are three GOOD examples of people using the Rule of Thirds in their videos.
Notice how they are fully framed in each shot. You can see their full face, shoulders and part of their body. Nothing is being cut off or cut out of the frame.


Bad framing examples
Example 1 - Subject is too close to the camera and the top of their head is cut off
Example 2 - Subject is only partially in frame and the lower half of their face is cut off
Example 3 - Subject is sitting too close to the right-hand edge of the frame and the top of their head is cut off
Example 4 - Subject is too far away from the camera
- 5. audio and sound
Audio quality is crucial in video making. Viewers may forgive poor image quality but not poor audio.
- If you have access to an external mic, please use this has this will provide4 the best sound quality.
- If you have to use your phone’s or computer’s audio you should record the video in a closed room to limit external noise.
- Try to record in a location without an echo.
- Check for any background noises you may normally screen out (e.g. fridges, fans, alarms etc.). If possible, turn them off.
- In most cities it is difficult to avoid vehicle noises and the sounds of other humans speaking and moving.
- Try to plan the timing of your video when the least noise is expected.
- Avoid filming outside. If you must, be aware of wind noises which can overwhelm the microphone and lead to poor sound quality.
NB: Poor audio can rarely be fixed in post-production.
- 6. landscape / portrait
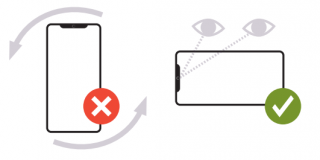
- Unless otherwise specified, always record your footage in landscape.
- If you’re using a smartphone, flip it on its side and don’t forget to look at the camera lens (and not the screen) when you are speaking.
NB: Computer monitors, televisions, even websites, all have landscape-oriented displays.
- 7. other FAQs
Do I need to worry about things like the exposure and focus?
No. Smartphones and digital cameras will automatically detect and adjust exposure and focus accordingly. It’s a good idea to not make jerky or sudden movements when you are recording so the autofocus doesn’t struggle to keep up with you.What if I make a mistake or I am interrupted?
Don’t worry. Even professionals need multiple takes when recording. If you make a mistake or you are interrupted, wait for a few seconds and then begin your sentence again.Should I use my camera’s zoom feature?
Unless you are using a DSLR camera with a dedicated zoom lens please do not use your digital zoom. This technology will pixelate your video considerably and makes it grainy. With high definition being the standard, pixelated videos stand little chance of being watched online. Your best bet is to set up the shot so you are framed perfectly.What about Wi-Fi and internet?
To ensure optimum connection at the time of recording, please do not overload your Wi-Fi with other simultaneous tasks (e.g. someone in the house watching a streaming channel or playing online games).Any other tips
- Relax and take a deep breath. Imagine you are having a conversation with a friend on the other side of the screen.
- Try a test run and watch it back – you’ll see if you need to adjust anything to the shot, lighting or audio.
- If you have a script read it aloud beforehand. You’ll get used to the sound of your own voice.
- Camera lenses are sharp, but not as sharp as the human eyes, so they do not capture all the subtle expressions that you notice in real life.
- ACCESSIBLITY AND INCLUSION
With video, accessibility starts with the script. It’s helpful to imagine that you are writing a radio script. Then, any action will have to be thought about in terms of speech or sounds. This will make creating the transcript very simple.
Think about the Hitchhiker’s Guide to the Galaxy. It started as a radio show (audio), then it became a book (text), and afterwards a film (visual). For each change in media, the story was accessible to everyone.
Important: All UCL audio-visual material must include transcripts or captions to ensure content is accessible to all. Please see below for further details.
What are captions?
- Captions are a text version of the spoken part of a video. They are in the language of the medium rather than a translation to another language.
- Captions can either be open or closed.
- Closed captions can be turned on or off with the click of a button.
- Open captions are part of the video itself and cannot be turned off.
What are subtitles?
Subtitles are translations for people who don’t speak the language of the medium (in this instance your video). You’ll see subtitles accompanying foreign films for example. Standard subtitles assume the viewer can hear the audio.What is a transcript?
Transcripts contain the text of what is said in a video. Transcripts should be created in the same language as the dialogue in the video. Transcripts are also a simple way of creating captions.What is audio description?
Audio description provides narration of important visual elements within a video to help people with impaired vision or those who otherwise need help to understand what is being shown on screen.What is automatic speech recognition (ASR)?
Automatic speech recognition or ASR for short, is a way to convert speech into text (also known as STT).Further Information:
- Many platforms include options for switching on automatic speech recognition (ASR). Please ensure you use them.
- Transcribing audio is time consuming, so you should plan accordingly. You can also use ASR features if the platform provides it.
- ASR can produce errors and will need to be checked manually to ensure transcriptions are correct. For example, it will mis-spell unusual names, mumbled and quickly spoken words, strong accents or acronyms. Always check automatically transcribed videos.
NB: Transcripts and captions make content more useable for everyone, not just deaf users or those with access needs For example, captions can be useful for someone watching in a noisy environment. Some people may want to skim read and not listen to an entire video. Others may want to copy the transcript text.
- RECORDING - Screen reader or Zoom
WITH SCREEN READER
This option provides better quality videos than using Zoom.
Option 1: On a PC
There are several PC screen recorders that you can download for free. Some Windows 10 devices also have it built in through an app called Game Bar. You just press Win+Alt+R to start your recording.Option 2: QuickTime media player (on Mac)
You can record yourself directly on QuickTime or if in a Zoom call, be able to interview participants by recording your screen at higher quality than the Zoom settings. Input locally and save the file out as .mov to preserve as much quality as possible.- It also means that the recording is not going to be effected by internet drop-out, buffering or visual and auditory glitches.
- To do this, you simply open QuickTime Player, choose File > New Movie Recording.
- Click on the drop-down arrow to the right of the Record button and choose the camera and microphone you want to use and change the Quality setting to Maximum.
- Maximum will record a 1280 x 720, 30fps Pro Res 422 .mov file
- High will record a 1280 x 720 30 fps H.264 .mov file at 7.8 Mbit/s (approx.)
- At the end make sure you save the file!
Option 3: A Smartphone
A smartphone is what many of us already have. We recommend downloading a third party video recording tool that offers more manual control. There are lots of them out there for Android and iOs, so feel free to experiment and research. For example, Filmic Pro (iOs & Android – around £14.99), can set resolution to 4K, frame rate to 24.Alternatively, the built-in Video Recorder using the back camera also works fine, but try to use tripod or something to stabilise the smartphone.
Connect an external microphone like Rode Lav directly into the phone for better sound.
WITH ZOOM
If you choose to use Zoom’s in-built, and very effective, recording feature here’s what you’ll need to do to get the best looking and sounding results.
The Best Settings for Recording a Zoom Meeting
You will need to toggle on a few different settings in the Zoom desktop app preferences to get set up correctly.Follow the instructions below to set up Zoom correctly:
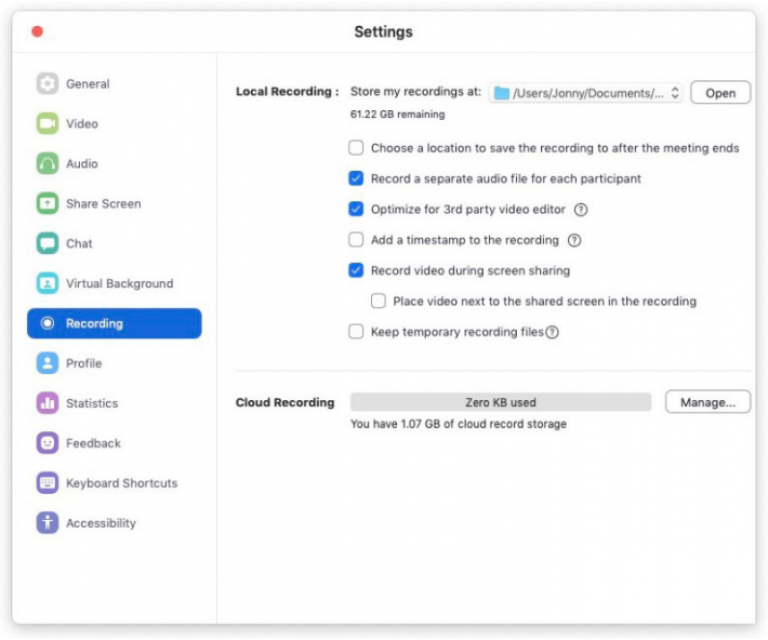
- Preferences > Video
- Enable HD
- Choose camera (for external camera feed)
- 16:9 widescreen aspect ratio
- Preferences > Recording
- Optimise for third party video editor
- Record separate audio file for each participant
- Record video during screen sharing
- Within Zoom, to record a meeting you simply press Record > Record on this Computer in the on-screen controls. Be sure you have permission from everyone on the call to do so.
You can also record in several different ‘modes’ including active speaker mode where only the speaker is shown, gallery mode (which might work well for a two-person interview) or bigger meetings and various shared screen modes which include either a large or small thumbnail of the speaker or a smaller gallery view on the side. This support article will show you what each of these look like.
NB: For more information on how to use Zoom, please visit the Zoom How-To page and watch this helpful video on YouTube.
Important:
- You have to be the host or be given recording rights by the host to be able to record and save the file on your device.
- If you’re in a call with someone you wish to record, remember to record on ‘Speaker View’ (button on the upper-right side).
- If a call participant has spoken, the main speaker needs to wait 5 seconds for the ‘Speaker View’ to switch back to them.
- BRANDING - How to correctly brand your videos
Templates and guidelines
Visit UCL’s Video branding page for full details, and log onto the Image Store for the assets and the guidelines as a PDF.
- Go to UCL’s Image Store for templates. Login to https://imagestore.ucl.ac.uk/
- Once logged in, go to: Home > UCL Brand Resources > Video branding templates
- Please follow this guidelines document (PDF)
NB: If you’re working with a video agency, please download the assets and guidelines and pass these to the agency.
Getting a Video Agency to help you create and edit video
- UCL Educational Media (ISD) offer a paid service. Email: video@ucl.ac.uk or find out more here.
- Visit the UCL approved supplier list (UCL login required).
Commissioning video work
Whether you are working with an internal video team, or commissioning external suppliers, they will need a clear and concise brief in order to deliver what you need. They can’t read your mind so use the brief to explain as much as possible about what the purpose of your brief is. Spending time on writing the brief also helps you clarify what the aim of the project is and why you are doing it.It’s worth the effort, because you’ll end up with a much better result. They will also need to understand the scope of the work in order to provide you with an estimate.
NB: As a generic guide, check this creative brief template (Word doc).