 Close
Close

Only trained and registered users nominated by their supervisor and approved by the NMR manager are allowed to book time, enter the NMR lab and place their group's samples in sample changers. For remote sample submissions, please install the necessary software and follow the instructions below, starting from To queue your sample.

If you plan to submit a sample, after booking the lab, you will need to reserve a position on the sample changer remotely, before taking your NMR tube to the NMR lab. Please follow the instructions below, starting from To queue your sample. Please wipe the bottom ~10 cm of your tube with acetone or isopropanol before taking it to the NMR lab. If the surface of the NMR tube is not clean, your NMR tube will fail to spin and the dirt from the NMR tube will transfer to the inner glass in the probehead inside the magnet.
In the NMR lab, you will mainly place your samples into sample changers or remove them from sample changers. Leave your watch, wallet, bank/travel cards, keys and any other personal items which can be affected by magnetic fields on the filing cabinet near the entrance or on the table between the old fridge and the printer. You can now cross yellow/black 5 Gauss lines on the floor. If there is a tube in the position reserved by you, remove it from the sample changer, release it from the blue spinner and place this tube in the beaker on the PC desk of the spectrometer. You could now use this spinner with your sample tube. If there is no tube in the position reserved by you, look for a free spinner in the sample changer (400MHz), in the rack above the spectrometer console (500, 600 and 700 MHz NMRs) or on the PC desk (300MHz NMR).
Before inserting your NMR tube into the spinner, clean the outside surface of the tube from fingerprint residues with the medical wipes provided. Use the depth gauge to set the NMR tube inside the spinner at the correct position. An NMR sample depth gauge can be found on the PC desk or above the console of every spectrometer. Each spectrometer has its own gauge.


The cylindrical depth gauge similar to those used on the 300, 500, 600 and 700MHz spectrometers is shown on the right, with its schematic presentation on the left. A square-based prismatic depth gauge is used on the 400MHz instrument. Please check that there is no broken glass or liquid inside the gauge before using it!
The sample is inserted slightly into the blue spinner first, then placed in the gauge for the correct height adjustment by further insertion. The tube is positioned such that the bottom of the tube touches the white level at the bottom of the gauge. See the picture on the right showing the bottom part of the depth gauge with the NMR tube inside it. The type of depth gauge shown in this picture is used on our 500, 600 and 700MHz spectrometers.
You may damage the equipment if you do not position the NMR tube correctly! After adjusting the height of the sample relative to the spinner, wipe off the bottom of the tube which has touched the white level inside the gauge. Make sure not to misalign the tube relative to the spinner.
The sample can now be placed in the position chosen by you on the sample changer. You could press the submit button either remotely from your own device or in the NMR lab using the mouse and keyboard of the NMR workstation.
Do not place an NMR tube in the sample changer if it is held loosely in the spinner. It will slip down inside the spinner when transported to and from the magnet. Please replace the tube or contact the NMR manager.
If you are in the NMR lab to collect your samples, please check the sample changer first, then the beaker on the desk and then the old fridge opposite the 300MHz magnet. If your NMR tube is in the sample changer, remove it from the sample changer, release it from the blue spinner and place the spinner in the rack either on the spectrometer consoles (500, 600 and 700MHz NMRs) or on the PC desk (300MHz). On the 400MHz NMR, place the spinner back in the same position in the 24-position sample changer. Never place free spinners without samples back in the sample changer on spectrometers with BACS-60 (300MHz) or SampleExpress (700MHz).
Do not take away spinners from the NMR lab. These are expensive, over £100 each. If found anywhere else in the department, they must be returned to the NMR lab.
Do not use the NMR lab for sample storage! Users must collect their NMR tubes from the NMR lab once all the NMR experiments have been run. The sample changers will be emptied from time to time. Samples removed can be found in beakers on PC desks or in the old fridge opposite to the 300MHz magnet.
To queue your sample, connect to the spectrometer of your choice, log in by selecting your supervisor's initials from the list and typing the correct password (case sensitive, check CAPS LOCK on the keyboard).
Double click on the position number on the screen to open an experiment line and fill in the details (position 20 in the example below):
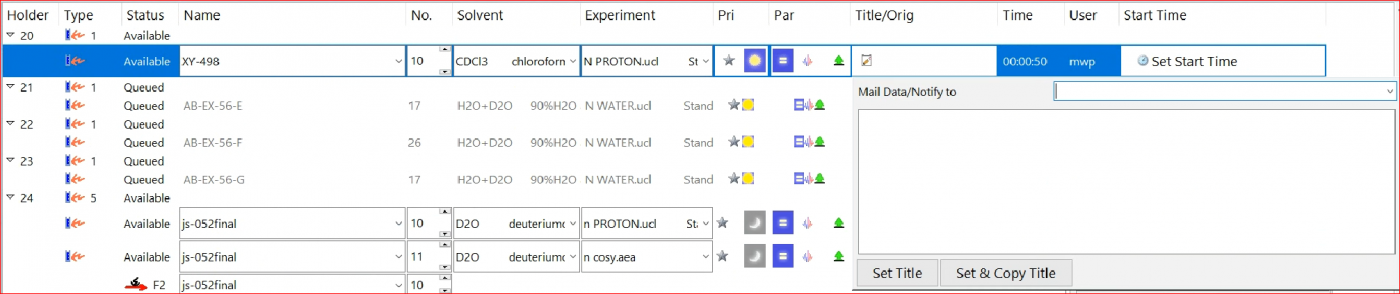
(1) Name - use letters and numbers, no space, no special characters except "-" or "_", e.g., ABC001 or XY-498 or AX_034. Initials of the person submitting the sample are used as the first two or three letters. Avoid using very long names.
(2) No. - the experiment number (e.g. 10) will be provided automatically and correctly by the program. You do not need to change it.
(3) Solvent - choose from the dropdown list.
(4) Experiment - choose from the dropdown list.
(5) Title/Orig - provided by you in a free format as a description of your sample with an additional e-mail option.
Should you wish to run more than one experiment, click "Add" and select another experiment from the dropdown menu. If you choose a 2D experiment, 2 or 3 experiments will appear in the list automatically. Avoid deleting additional lines or editing numbers in the "No." column. See (5) in Common problems for more details.
If your sample has already been placed in the sample changer, highlight the first line with the position number and click the "Submit" button on the left middle of the screen. This will submit all experiments for a given position without the need to submit each experiment separately. Click "Change User" to log out and disable access to your account.
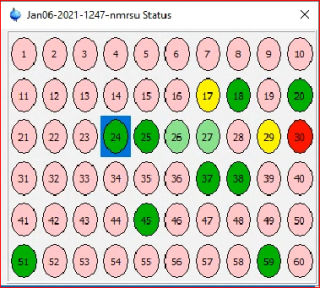
If your sample has not been placed in the sample changer yet, click "Change User" to log out. The position you selected will appear in light green on the screen (see positions 26 and 27 in the picture above, showing 60 coloured circles) and would imply that the position is reserved. Once your sample is placed in the sample changer, please log in, click on the position number reserved by you earlier and click the "Submit" button on the left middle of the screen. Click "Change User" to log out and disable access to your account.