Disclaimer: This information is intended for the use of Data Safe Haven account holders only and may not be distributed nor reproduced for public distribution in any form.
Scroll down or select one of the options below to go to the section you need:
| Everything you need to know | Key information regarding the Data Safe Haven |
| Security & Tokens Portal | Self Service Portal for Password changes, emergency access and token changes |
| Application & Data Portal | Accessing data within the Data Safe Haven and guidance on some of the applications and services available within the DSH including using Artifactory for Anaconda and R |
| File Transfer Portal | Portal for secure transfer of files to and from the Data Safe Haven |
| Research Computing | If you need Linux applications, more compute power, access to GPUs or a batch scheduler, additional compute resources, including a cluster, can be accessed from the DSH Desktop |
| Version Control | Keep track of different versions of your research software in the DSH with git – a tool that is widely used to coordinate software development |
| REDCap Services | Secure web platform for building and managing online surveys |
Everything you need to know about the Data Safe Haven
If you are a Data Safe Haven account holder you should be familiar with a few things.
- The password policy
Your DSH password will be valid for 90 days. You will receive reminders from 30 days before your password is due to expire warning you to change your password. Even if you miss this opportunity you can still change your password, but don't wait too long, for more information read up on the account disablement/deletion policy available on this page.
You can change your password in one of two ways:
Self-Service Console - For changing your password using your existing one
Reset Password Console - For resetting your password when existing one forgotten or does not workPlease see the Security & Tokens Portal section below for further instructions on how to change your password.
Choosing an acceptable password
The password must be at least 12 characters long. The password must follow these rules:
- Include all of the following:
1. Lowercase characters
2. Uppercase characters
3. Numbers
4. Symbols, i.e. ~!@#$%^&*_-+=`|(){}[]:;"'<>,.?/ - Cannot exceed 8 repeated characters in the password
- Cannot exceed 5 characters in a sequence (123456 or abcdef)
- Include all of the following:
- Two-factor authentication (What is a One-time password code? What is a Token PIN?)
Two-factor authentication is an extra layer of security for your Data Safe Haven account designed to ensure that you're the only person who can access it.
To access data in the Data Safe Haven you will require your DSH User ID, DSH static password, PIN and a one-time password code. To keep your account as secure as possible, there are a few simple guidelines you should follow:
- Remember your DSH static password
- Remember your PIN
DSH Static Password
This is the password composed of letters, numbers and symbols you created during the induction and is changed every 3 months (see the password policy in the previous section).
Token
A token is a device or an app that displays a temporary 6-digit number - one-time password code (OTP). The token is set up on your mobile phone at the induction using the OTP generator app called MobileID. This number changes continuously every 30 seconds, when you view the number it could be at any point within the 30 second cycle. For instance, you look at the 6-digit number on your token, but it changed in just 5 seconds, this means you viewed the number on the 25th second of its cycle. You must complete an authentication process before the number changes.
Token PIN
Your token for the Data Safe Haven has a PIN, this is the 4-digit number you chose at your induction. This is referred to as a “Token PIN” or “PIN”. A Token PIN is an extra password attached to your token. For instance, if your token displays the code 000123 and the PIN is 0987 then the PIN+Token submitted in the authentication process is 0987000123. You set your PIN when your Token is issued to you during your induction.
- The account disablement/deletion policy
- Your password must be changed every 90 days, if it is not changed in this time you will not be able to log into your account until it is changed.
- If you do not change your password for a further 90 days after it has expired, your account will be deleted (no data is lost due to this process)
- The exception is if you are an Information Asset Owner in which case your account is disabled and you will need to contact dsh-support@ucl.ac.uk to be re-activated.
This improves the overall security of the system and ensures that we are complying with external requirements from data providers and our ISO27001 auditors. The Windows Infrastructure Services (WIS) team recommend you log in to the Data Safe Haven at least once every three months to have continued access to the service.
- Weekly Maintenance
Weekly Systems Maintenance
Every Monday 00:00 – 02:00
Weekly systems maintenance of the Data Safe Haven is carried out between 00:00 – 02:00 every Monday. If you need to run extensive data operations over a number of days [RStudio and/or STATA] ensure that it completes before this time as the maintenance involves a reboot of the servers.Change Maintenance Window
Wednesday 08:00 – 10:00
Minor changes to the Data Safe Haven are scheduled for Wednesday 08:00 – 10:00. There should be no service disruption however access to the system should be considered ‘at risk’ during this time. Where there are planned changes with a service disruption, Data Safe Haven customers are emailed with details of the change.- File Transfer Portal Lockout (I can log in to the Application & Data Portal but I can not log in to the File Transfer Portal)
You can be locked out of the File Transfer Portal due to 8 incorrect password attempts.
Contact Data Safe Haven Support to regain access:
dsh-support@ucl.ac.ukIf you have forgotten your password, please log in to the Security & Tokens Portal to reset it.
- Secure Data Deletion
Request that data is securely deleted from within Data Safe Haven here.
Where there is a requirement for secure, certified data deletion. A “DSH – Data Deletion Record” will be issued upon completion of this request.Data Safe Haven – Secure Data Deletion
A Data Safe Haven Systems Administrator will delete the data specified in the “Data Safe Haven - Secure Data Deletion” request and overwrites all free space on the storage media using the Cipher Security Tool.
Cipher Security Tool (cipher.exe)
It is a software-based data erasure method, it serves to overwrite free space on a hard disk or another storage media with a 3-pass overwrite.
Pass 1: Overwriting all free space with a zero;
Pass 2: Overwriting all free space with a one;
Pass 3: Overwriting all free space with a random characterData Safe Haven Storage
The Data Safe Haven utilises an enterprise level storage solution, data is redundantly spread across multiple disks within the server infrastructure. Should an individual disk fail, it is retained by UCL and disposed of using disk crushing machinery.Data Safe Haven Customer Data Backups
The backup retention period is 90 days.
The Data Safe Haven utilises an enterprise level encrypted backup solution. It is not possible to delete individual data items from our backup media and the data becomes unrecoverable after 90 days from the deletion date. Where Data Safe Haven data has been securely deleted, the support team have procedures to prevent deleted data from being restored from backup during the 90 day period.- What is the Data Safe Haven 'walled garden'?
We use the term ‘walled garden’ to refer to the security concept at the heart of the Data Safe Haven, where all storage and processing of identifiable data takes place within a controlled environment. Users access their data using a remote desktop technology, which has been hardened to prevent data from accidental or deliberate transfer to the endpoint device, including copy & paste and connected storage. Whilst using the Data Safe Haven, customers are prevented from accessing any external network resources (web sites, email, etc). The security boundary is protected by a commercial threat management product.
Security & Tokens Portal
Self Service Portal for Password changes and Emergency Access.
- Emergency Access (I don't have my token / How do I log in if I don't have my token?)
You can use the Emergency Access Console to log in even if you do not have your token.
1. Go to the Emergency Access Console
https://registration.idhs.ucl.ac.uk/dea
2. Enter your DSH User ID and click Next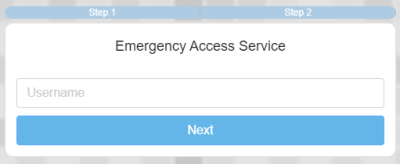
3. Enter your DSH Password and click Verify
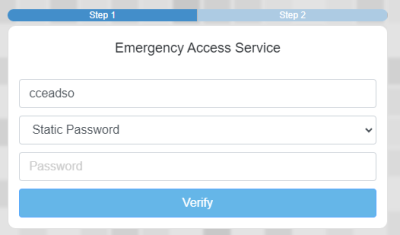
4. Click on the Mail icon to email you an authorisation code
5. Go to your email and enter the authorisation code when you receive it and click Verify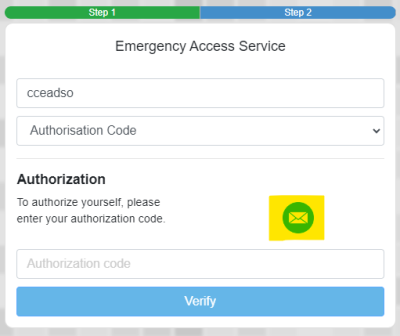
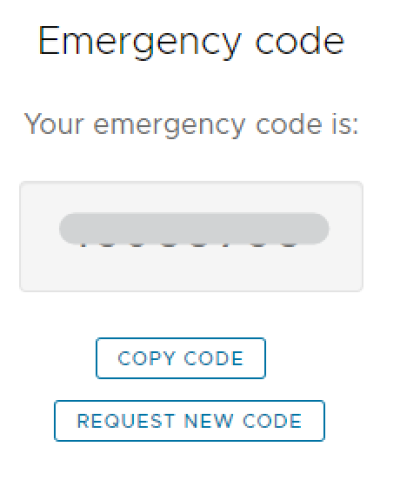
6. Your emergency code will be displayed. It will expire when used, or after 24 hours.
7. Go to the Application & Data Portal
https://accessgateway.idhs.ucl.ac.uk/
8. Enter your DSH User ID and DSH Password
9. Enter the 8 digit emergency code in the PIN+Token box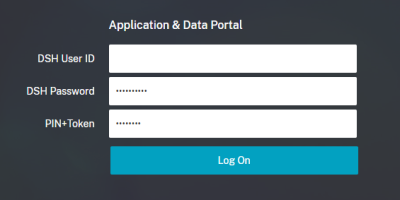
- Change Data Safe Haven Password
Your DSH password will be valid for 90 days. You will receive reminders from 30 days before your password is due to expire warning you to change your password. Even if you miss this opportunity you can still change your password here, but don't wait too long, for more information, read up on the account disablement policy available on this page.
Change Data Safe Haven Password
Go to the Security Portal Self-Service Console
https://registration.idhs.ucl.ac.uk/dsc1. Enter your DSH User ID and click Next
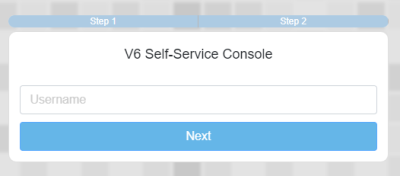
2. Enter your DSH password and click Verify
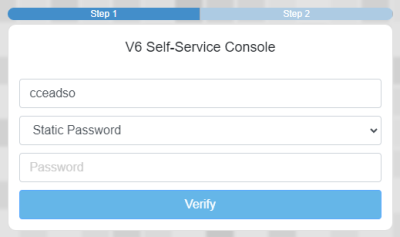
3. Enter your DSH One-Time Password Code (Token) in the first box and PIN in the second box
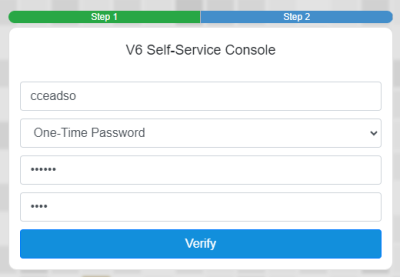
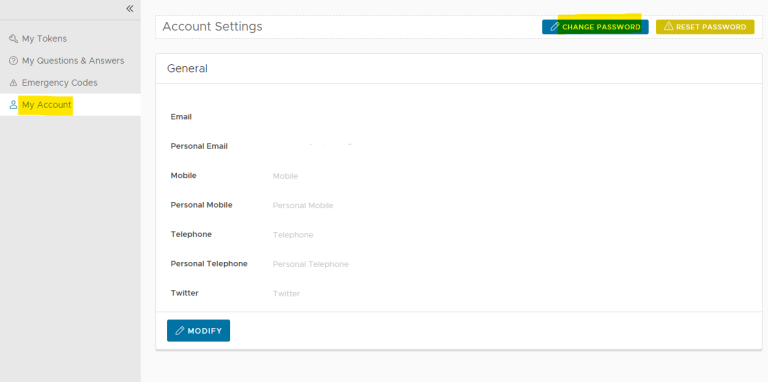
4. Click on My Account in the left hand menu and click on Change Password
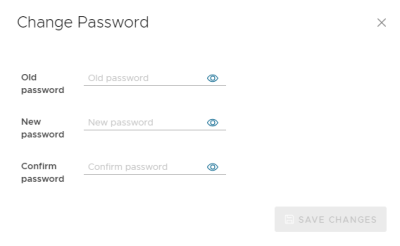
5. Enter in your old and new passwords and click Save Changes
Choosing an acceptable password
The password must be at least 12 characters long. The password must follow these rules:
Include all of the following:
1. Lowercase characters
2. Uppercase characters
3. Numbers
4. Symbols, i.e. ~!@#$%^&*_-+=`|(){}[]:;"'<>,.?/
Cannot exceed 8 repeated characters in the password
Cannot exceed 5 characters in a sequence (123456 or abcdef)- Reset DSH Password (I forgot my password / How do I reset my password?)
If you don't remember your DSH password, follow these steps to reset it.
Reset DSH Password
1. Log in to the Security Portal Reset Password Console
https://registration.idhs.ucl.ac.uk/drp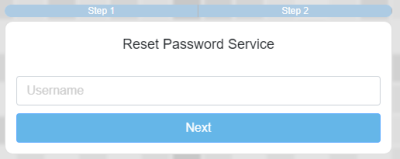
2. Enter your DSH One-Time Password Code (Token) in the first box and PIN in the second box
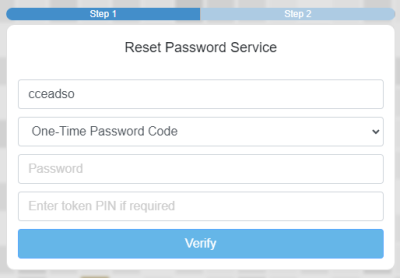
3. Click on the Mail icon to email you an authorisation code
4. Go to your email and enter the authorisation code when you receive it and click Verify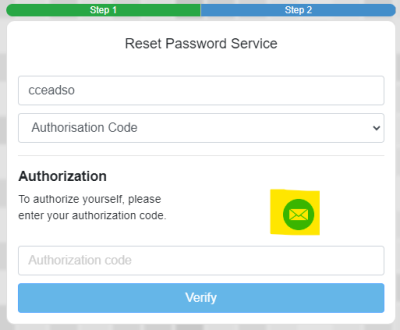
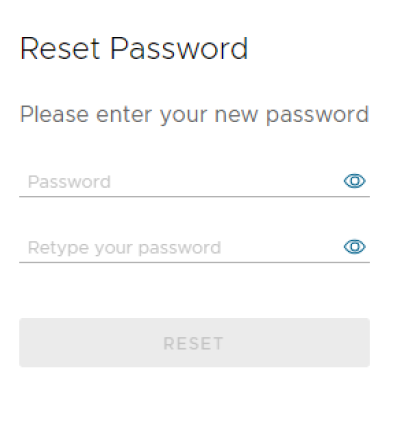
5. Enter a new password and click Reset
Choosing an acceptable password
The password must be at least 12 characters long. The password must follow these rules:
Include all of the following:
1. Lowercase characters
2. Uppercase characters
3. Numbers
4. Symbols, i.e. ~!@#$%^&*_-+=`|(){}[]:;"'<>,.?/
Cannot exceed 8 repeated characters in the password
Cannot exceed 5 characters in a sequence (123456 or abcdef)- Reset Token PIN (I forgot my PIN / How do I reset my PIN?)
Your token for the Data Safe Haven has a PIN. This is referred to as a “Token PIN” or “PIN”. A Token PIN is an extra password attached to your token. For instance, if your token displays the number 000123 and the PIN is 0987 then the PIN+Token submitted in the authentication process is 0987000123.
Reset PIN
1. Log in to the Security & Tokens Portal
https://registration.idhs.ucl.ac.uk/dsc
2. Click My Tokens
3. Identify the correct token by checking the serial number on the back of the token and comparing it to those in the list
When you have identified the correct token click the down arrow icon on that row and select Reset PIN
4. Enter a new 4-digit memorable PIN and confirm the new PIN
5. Click Submit- Disable Token (I lost my token / What do I do if I lose my token?)
If you lose your token, you must disable it immediately and then report it to Data Safe Haven Support. Follow these steps to disable the token.
Even if you have lost your token you can use the Emergency Access console to then access the self-service console to disable your token.
Disable Token
1. Go to the Emergency Access Console
https://registration.idhs.ucl.ac.uk/dea
2. Enter your DSH User ID
3. Enter your DSH password and click Verify
4. Click Mail Icon to send authorisation code to your email
5. Enter the authorisation code and click Verify
6. Copy the emergency code
7. Go to the Self-Service Console
https://registration.idhs.ucl.ac.uk/dsc
8. Enter your DSH User ID
9. Enter your DSH password and click Verify
10. Copy the emergency code into the One-time password box (no need to enter a PIN here)
11. Click My Tokens
12. Click the down arrow icon for the lost token and select Disable
13. On the dialogue box "Are you sure you want to disable this token?" click OKReport lost tokens to Data Safe Haven Support by emailing dsh-support@ucl.ac.uk
Remember to add your contact details so that we can get back to you.
- What is a One-Time Password?
A token is a device or an app that displays a number, the number changes continuously every 60 seconds, this can be referred to as a One-Time Password. When you view the One-Time Password it could be at any point within the 60 second cycle. For instance, you look at the 6-digit number on your token, but it changed in just 5 seconds, this means you viewed the number on the 55th second of its cycle. You must complete an authentication process before the number changes.
- Create a Soft Token (How to create a soft token?)
Install the "DeepNet MobileID" app on your smart phone, it is free and can be found on most app stores.
1. On your smart phone, launch App Store (iPhone) or Play Store (Android)
2. Search for ”MobileID” or ”Deepnet MobileID” and install itCreate Token
1. Log in to the Security & Tokens Portal
https://registration.idhs.ucl.ac.uk/dsc
2. Click the My Tokens tab and then click Create
3. On the Product drop-down list select MobileID/Timed-Based and click Create New
4. Assign a unique PIN to the new token by clicking the down arrow on newly created token and select Reset PIN
5. Enter a new 4 digit PIN in the top text box, type it again in the Confirm text box and click Save
4. Receive the token by clicking the down arrow again, select PUSH and then click Email
You will be sent an email shortly with the subject line "DSH - Your Token (MobileID)", follow the instructions in the email to add the token to the MobileID appIf you do not have your hard token to hand you can use the Emergency Access Console
Application & Data Portal
Portal for secure handling of data using applications available in the Data Safe Haven and Securely transferring data out of the system.
- How to log in
Go to the Application & Data Portal
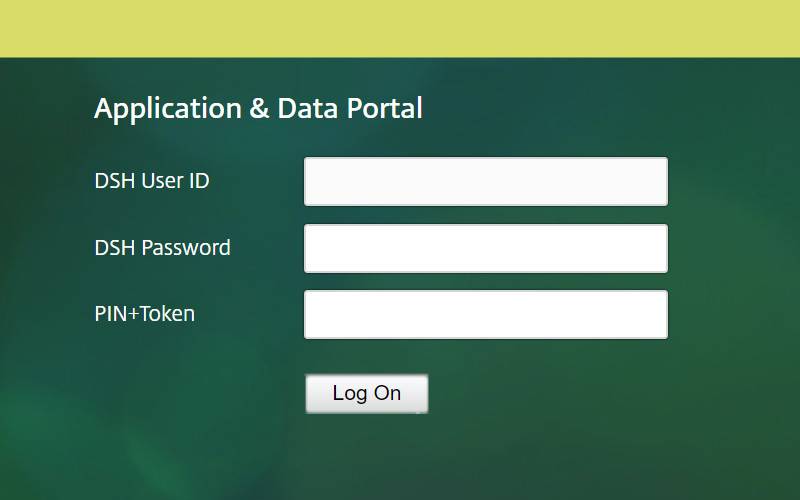
https://accessgateway.idhs.ucl.ac.uk/Enter your DSH User ID and DSH Password
Enter your PIN+Token and click Log OnA PIN is an extra password attached to your token. For instance, if your token displays the number 000123 and the PIN is 0987 then the PIN+Token is 0987000123.
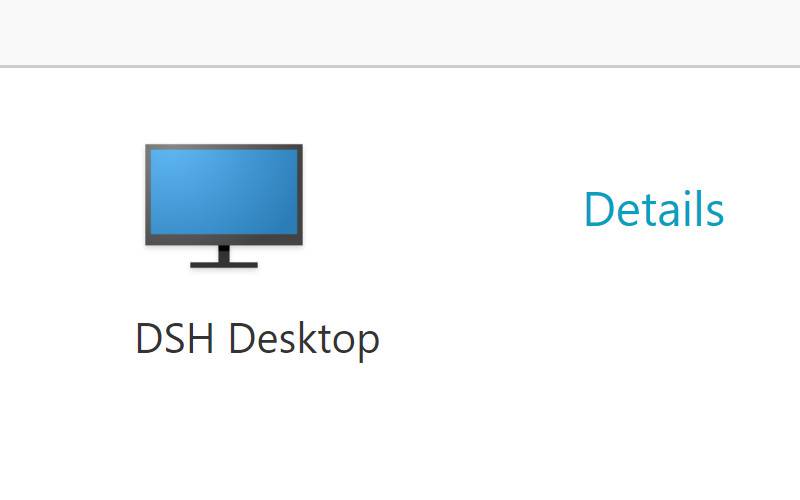
Click the DSH Desktop icon
The DSH Desktop will launch in either the Citrix Receiver or Web Browser depending on your configuration.
- Citrix Receiver vs Light Version
Citrix Receiver is a free client software that provides access to the DSH Desktop easily and securely from any device, including tablets, PCs and Macs. In order to get the best experience we recommend you install the Citrix Receiver, as it provides the most reliable and full featured experience.
Light Version is when the DSH Desktop opens in your web browser. Light version is a great option when you do not have the Citrix Receiver installed nor the rights to do so.
- Why does the error message 'Cannot logon at this time' sometimes come up?
This is nothing to do with your DSH account.
The message is actually literal, the Citrix software won't allow a connection from the current browser session and is due to confusion with stored cookies in the web browser.
To fix/workaround, try any of:
Close the browser - not just the relevant tab - completely
Use Private/incognito mode in the browser
Use a different browser
Restart the machine
Clear cookies for *.idhs.ucl.ac.uk
DSH Desktop
The DSH Desktop is a Windows Virtual Desktop, there are a number of virtual machines (VMs) that allows multiple concurrent interactive sessions. New sessions are connected to a virtual machine with the least load.
- Group (S:)
The Group (S:) drive is the location for your research data folders and all members of the research team will have access to this area. There are no set limits to the size of data which can be stored in this area, although we do ask that for data over 500GB you discuss this with the DSH support team first, so that we can ensure there is enough storage available. This area should be used for storing all files related to your research including original data sets, temporary files and aggregate outputs. Where an Information Asset Owner would like to provide separate work areas to different colleagues, they can create subfolders in this area to accommodate this way of working.
Restrictions: There is no technical limit to how long data can stay in this area, as long as there is an active UCL Information Asset Owner. This location can accommodate large data sizes, but please discuss it with the DSH support team if you intend to store more than 500GB.
Protection: Daily backup.
Permissions
There are different permissions that can be assigned when adding users to the share by the IAO or IAA, these are explained below.
Write
This provides full access to the share which allows read, modify and delete on all files in the share.
Read
This provides read only access to the share so the user would not be able to modify or delete any files. This could be useful if you do not wish users to modify master data but allow them to copy into a separate share.
Dropbox
This is to enable transfer of files between shares without having to provide full access to a share. It provides access only to a folder called Dropbox in a share which the user can copy files to, the user will not be able to see anything else in that share apart from the Dropbox folder or files that have been copied into the Dropbox folder by other users. Please contact dsh-support@ucl.ac.uk to request setup of this permission.
- MFT Arrivals (Q:)
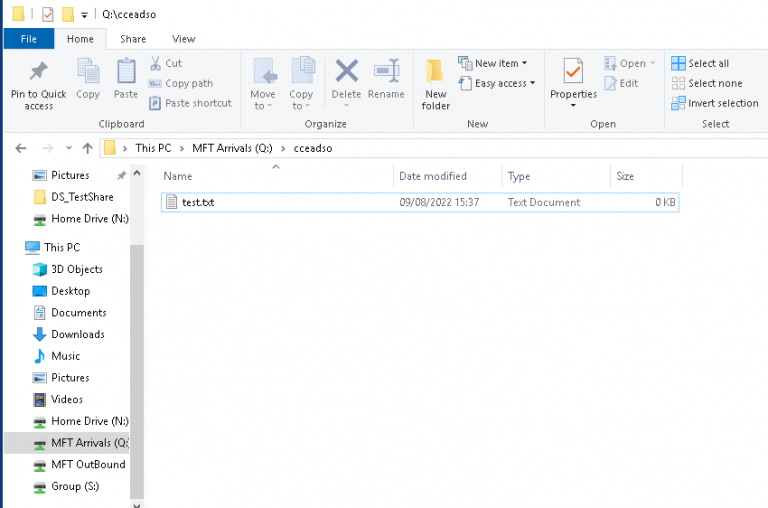
The MFT Arrivals (Q:) drive is the temporary location for any files which have been transferred into the DSH using the Managed File Transfer portal (https://filetransfer.idhs.ucl.ac.uk) or FTPS services. Files should be moved from this location to your research data location on the Group (S:) drive as soon as possible, as they will be deleted 30 days after arrival. Transferred files will be found in a folder named after the username of the person who transferred the file.
Restrictions: Files in this area will be deleted 30 days after they were created.
Protection: Daily backup.
- MFT Outbound (R:)
The MFT Outbound (R:) drive is the location for temporarily making files available for export using the Managed File Transfer Portal or FTPS services. All Data Safe Haven account holders can copy files to a group folder within the MFT Outbound (R:) drive. Only Data Safe Haven account holders with outbound rights can retrieve these files from the File Transfer Portal. By default, only the Information Asset Owner has outbound rights. Information Asset Owners can submit a request to delegate outbound rights to members of their research team. Files should only be copied here for the time required for the export, and then deleted once the export is completed.
Restrictions: Files in this area will be deleted 30 days after they were created.
Protection: Daily backup.
- Home Drive (N:)
The Home Drive (N:) should not be used for any research data, all research data should be held on the Group (S:) location (whether original data sets, temporary files or aggregate outputs from analysis). For information governance purposes it is important that research data is not copied here so that the Information Asset Owner knows that any changes to IG that they make (eg data deletion requests) will apply to all data assets associated with their research. This location is used by the Windows system for temporary files, user personalisation etc. and only has a small amount of storage allocated to it. This area is limited to 50GB per user.
Restrictions: There is a size limit of 50GB in this area. On account deletion, data in this area will be retained for 3 months and then deleted.
Protection: Daily backup.
- DSH Applications
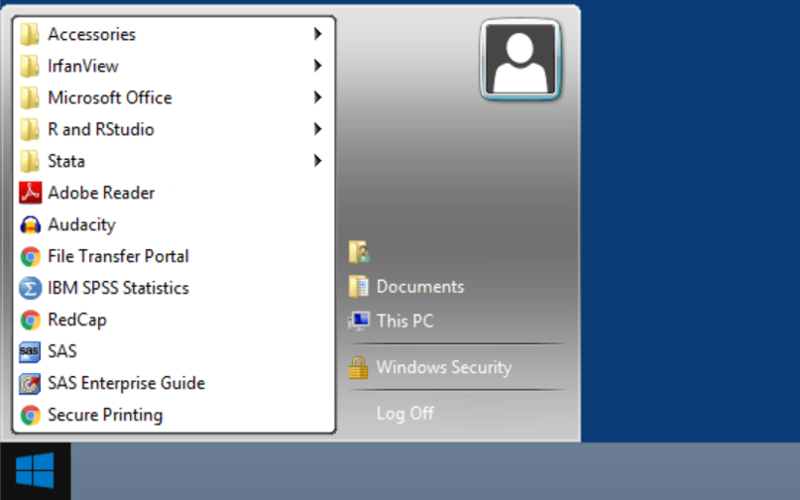
The Start Menu is the primary location in the DSH Desktop to locate your available applications. The Start Menu is accessed by clicking the Start button, located in the bottom left-hand corner of the desktop screen.
For more information, visit the Applications and Services on DSH web page.
- Log Off vs Disconnect
Log Off
A log off ends the session, any applications running within the session will be closed and unsaved changes made to open files will be lost. The next time you log on, a new session is created. The Log Off button can be found in the Start Menu. Whenever possible, please save all your work and log off.
Disconnect
A disconnect leaves the session running, you can reconnect and resume the session later. If you are running a task, such as time consuming statistical analysis, etc., you can start the task and disconnect from the session. Later, you can log back on, re-enter the session, and check the results. A disconnected session lasts up to 18 hours. After 18 hours of being in a disconnected state any applications running within the session will be closed and unsaved changes made to open files will be lost.
- DSH Desktop sizing and limitations
The DSH Desktop virtual machines have been configured to handle heavy workloads, a heavy workload may include database entry applications, command-line interfaces, Microsoft Word, Microsoft PowerPoint and data science solutions such as R and Stata.
Some data science solutions consume as much of the system's resources (vCPU, memory) that is available, this can negatively impact the performance of other sessions on the same virtual machine (VM). We recommend you limit how much resource you allocate by only using as much as you need rather than how much is available and use compression features if possible.
The DSH Desktop hardware does not have any graphics processing units (GPUs) that would enable the use of graphics-intensive programs for video rendering, 3D design, and simulations.
- Application - R 3.6 package libraries
By default, the library search path for R 3.6 (only) on the DSH Desktop is initialised at startup from the environment variables R_LIBS ("//IDHS.UCL.AC.UK/common/R/3.6") and R_LIBS_USER ("N:/My Documents/R/win-library/3.6").
The common R library is a read only library that will be actively managed and updated by us. Upon request, new R packages will be installed to this location for all Data Safe Haven customers to use. If you require your own library with specific packages and versions please create an exhaustive list and ask your IAO/IAA to submit it via the online Software Request form.
Changing your library location
- To replace default library locations, you use the function .libPaths().
- To append to the list of libraries you may follow this example, libPaths(c("N:/My Documents/R/win-library/my own library", .libPaths()))
- And to define a library path for a specific project, you can create a .Rprofile file in the root of your project, and then make the changes there.
- How do I install packages on Anaconda using Artifactory?
Artifactory is an internal repository within the DSH, which allows you to install approved Python packages in your Anaconda environment. This includes Conda and PyPi.
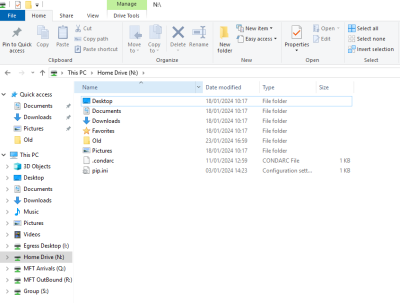
Prerequisite- You will need to create a .condarc file which you will place in your Home Drive (N:). Open Notepad, go to Save As, type .condarc as the File Name, select All Files (*.*) from the Save as type drop down list.
- You will also need to create a pip.ini file which you will place in your Home Drive (N:). Create using Notepad as above.
Notes
- You will need to complete this process each time you change your password.
- There are pairs of shortcuts for Anaconda Prompt and Jupyter Notebook for either the N or S drive depending on where you want your project directory in jupyter notebook.
Set up Anaconda with Conda
1. From the Start menu open Artifactory
2. To login, use your DSH User ID and DSH Password
3. From the left menu bar, select Artifacts and then Conda
4. Click Set Me Up
5. In the top right hand corner, type your DSH Password in the Type Password credential box and click the arrow icon.
6. From the General section, copy the code snippet
7. Copy into .condarc fileSet up Anaconda with PyPi (pip)
1. Go back to Artifacts and select PyPi
2. Click Set Me Up. Credentials should already be entered from previous steps
3. From the Resolve section, copy the code snippet (2 lines)
4. Copy into pip.ini file (please note this differs from the filename listed in Artifactory's "Set Me Up" instructions, which refer to ~/.pip/pip.conf - use pip.ini if configuring the standard DSH Windows machine, and ~/.pip/pip.conf if using a DSH Linux installation)Create environment
1. Add the following text pointing to a folder which will hold your shared environments to your .condarc file (note they must be on separate lines):
2. envs_dirs:
- S:\\sharename\anaconda-environments
3. From the Start menu open Anaconda Prompt
4. Create Environment: conda create --prefix S:\sharename\anaconda-environments\environmentname python=3.8.5
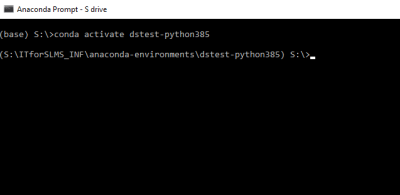
5. Activate Environment: conda activate environmentnameExample below I have created an environment called dstest-python385 following the above method and this is the activation:
Jupyter Notebook
1. Open Anaconda Prompt
2. Activate new environment
3. conda install ipykernel
4. pip install jupyter
5. type jupyter notebook to run programSpyder
1. Open Anaconda Prompt
2. Activate new environment
3. conda install spyder-kernels=1.9.3
4. Revert to base – conda deactivate
5. Type Spyder to run program
6. Go to Tools – Preferences, select Python interpreter
7. Select Use the following Python interpreter and browse to python in the new environment – S:/sharename/anaconda-environments/environmentname/python.exe
8. Open Consoles menu and select New console (default settings)Common Anaconda Errors
CondaHTTPError: HTTP 000 CONNECTION FAILED for url https://repo.anaconda.com/pkgs/main/win-64/current_repodata.json
An HTTP error occurred when trying to retrieve this URL.This indicates that there is no .condarc file or there is a problem in how it has been configured. Please follow the above steps carefully. Here are some common reasons:
- The .condarc file has been incorrectly saved. When you save the file in Notepad you must select All Files in the Save as type drop down list otherwise it will be named .condarc.txt and will not be recognised. Delete the file and try again.
- The file has been saved to the wrong location, it must be saved to the Home Drive (N:) and not in a subfolder or the S drive.
- The file is incomplete, ensure that the whole code snippet is copied from Artifactory, there are 5 lines to copy.
- There is a problem with the formatting of the file, it must be set up exactly as described above including the use of separate lines.WARNING: Retrying (Retry(total=4, connect=None, read=None, redirect=None, status=None)) after connection broken by 'SSLError(SSLCertVerificationError(1, '[SSL: CERTIFICATE_VERIFY_FAILED] certificate verify failed: self signed certificate in certificate chain (_ssl.c:1123)'))': /simple/packagename/
This indicates that there is no pip.ini file or there is a problem in how it has been configured. Please follow the above steps carefully. Here are some common reasons:
- The pip.ini file has been saved with the incorrect name.
- The file has been saved to the wrong location, it must be saved to the Home Drive (N:) and not in a subfolder or S drive.
- The file is incomplete, ensure that the whole code snippet is copied from Artifactory, there are 2 lines to copy.- How do I install packages in R using Artifactory?
Artifactory is an internal repository within the DSH, which allows you to install CRAN packages in your own repository.
Prerequisites
- You will need to create a project in Rstudio
- You will need a .Rprofile file
- R only uses one .Rprofile in any session, on the DSH Desktop, place the .Rprofile file in the project directory. To create a new .Rprofile file, open Notepad, go to Save As, type .Rprofile as the File Name, select All Files (*.*) from the Save as type drop down list.
Notes
- To overwrite the default DSH Desktop R library path with your own, use the function .libPaths() in your .Rprofile.
- You will need to complete this process each time you change your password.
- Open the project by going to This PC - Home Drive (N:) and where it is saved and not Quick access - Documents.
Setup R with Artifactory
1. From the Start menu open Artifactory
2. To login, use your DSH User ID and DSH Password
3. From the left menu bar, select Artifacts and then CRAN
4. Click Set Me Up
5. In the top right hand corner, type your DSH Password in the Type Password credential box and click the arrow icon
6. From the General section, copy the code snippet to your .Rprofile
7. Open Rstudio, you will now be able to install CRAN packages as normalCommon RStudio Errors
Warning: unable to access index for repository https://cran.rstudio.com/src/contrib:
Cannot open URL ‘https://cran.rstudio.com/src/contrib/PACKAGES’This indicates that there is no .Rprofile file or there is a problem in how it has been configured. Please follow the above steps carefully. Here are some common reasons:
- The .Rprofile file has been incorrectly saved. When you save the file in Notepad you must select All Files in the Save as type drop down list otherwise it will be named .Rprofile.txt and will not be recognised. Delete the file and try again.
- The file has been saved to the wrong location, it must be saved to the same directory as the project.
- The file is incomplete, ensure that the whole code snippet is copied from Artifactory, there are 4 lines to copy.
File Transfer Portal
Portal for secure transfer of files to and from the Data Safe Haven.
- How to log in
Go to the File Transfer Portal
https://filetransfer.idhs.ucl.ac.uk/webclient/Login.xhtmlFor Data Safe Haven Account holders:
To login, use your DSH User ID and DSH Password.For DSH File Transfer Accounts:
To login, use your registered User Name and Password.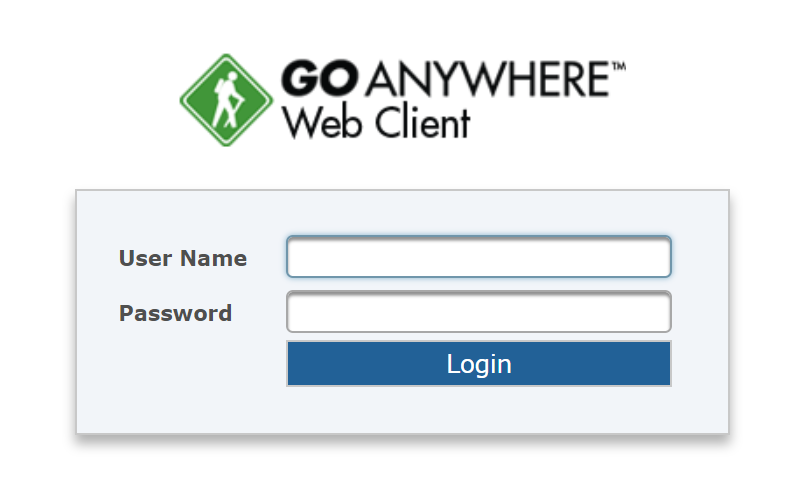
- How to transfer files to the Data Safe Haven?
Files can be transferred from your physical device to the Data Safe Haven using the File Transfer Portal.
Click the Upload button to open a File Explorer
Select the file to upload, this lets you browse your local (non-DSH) file system to find the files

You should then see 'Upload Complete' at the foot of the screen
Log into the DSH Desktop Session (Applications and Data Portal)Go to This PC > MFT Arrivals (Q:) >, you should see a folder matching your username. It may not be visible immediately, depending on the size of the file it may take a bit of time for the transfer to complete in the background.
You should transfer the file to a Share on Group (S:) as soon as possible. Files in the Arrivals folder will be deleted 30 days after they were created.
- Invite Users to transfer files to the DSH
The Invite Users feature gives anyone you invite the ability to upload files to the Data Safe Haven, these files can be retrieved within the DSH by any of the inviters research group members.
At the top right look for the menu hidden under the icon showing the 1st letter of your username
Choose Invite users
When you send an email they get a link to create an upload-only account. Ensure that the recipient is expecting the mail and ready to act as the invites time out after 24 hrs. This account cannot log in to the Application & Data Portal nor the Security & Tokens Portal.
When they upload you will get an email. Then you have to login to the APPs& Data Portal and retrieve the uploaded file(s) from Q:\Your_invitees_Chosen_Username and
1. copy to S:\Your_Study_Sharename
2. Delete from Q
Do NOT leave files in Q: as the area is wiped after 30 days- Configure FTP Client (How to transfer large files to the Data Safe Haven?)
If you are going to transfer more than 10 files or files larger than 100GB we recommend you use an FTP client.
FTP stands for File Transfer Protocol, an FTP client is an application used to transfer files between two computers. You can use an FTP client to transfer files to the Data Safe Haven.
FTPS Settings
All FTP sessions to the Data Safe Haven require an FTPS connection with TLS protocol support for increased system security. If you already have an FTP tool, make sure that it supports FTPS. If you are unsure if your tool supports FTPS, we suggest reviewing the program's help files.
Server (Host): filetransfer.idhs.ucl.ac.uk
Protocol: FTPS
Encryption: TLS
Connection Type: Implicit
Port: 990FileZilla Settings
Server (Host): filetransfer.idhs.ucl.ac.uk
Protocol: FTP - File transfer Protocol
Encryption: Require implicit FTP over TLS
Logon Type: Interactive (For security reasons Data Safe Haven credentials should not be saved)
Transfer Mode: Passive
User: DSH User ID
Password: DSH PasswordThe step by step guide below describes how to configure FileZilla for the Data Safe Haven.
1. Open FileZilla
2. Select File and click Site Manager...
3. Click New Site and name it DSH
4. Enter the following details:
-Host: filetransfer.idhs.ucl.ac.uk
-Protocol: FTP - File transfer Protocol
-Encryption: Require implicit FTP over TLS
-Logon Type: Interactive
(For security reasons Data Safe Haven credentials should not be saved)
-User: enter your DSH User ID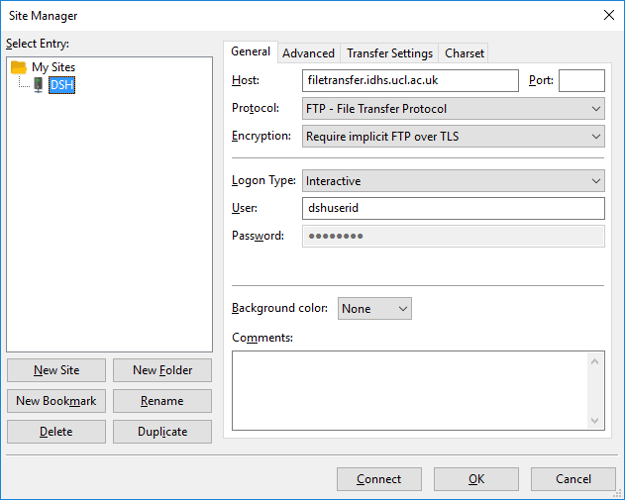
5. Select the Transfer Settings tab
6. Select Passive
7. Click OK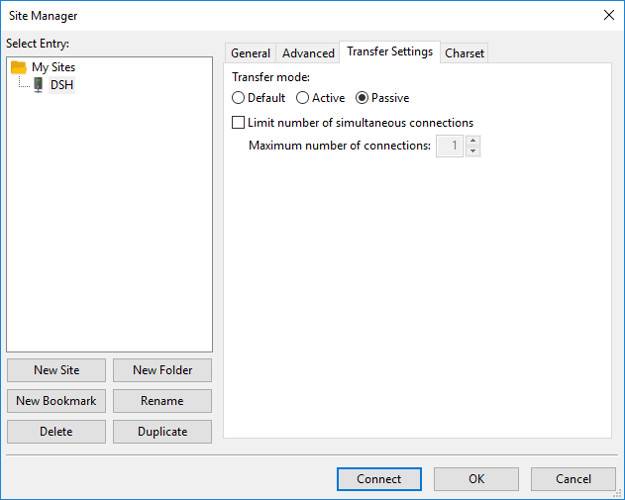
Common FTP Errors
"Could not connect to server": This can be caused due to an incorrect configuration setting
"Critical error: Could not connect to server": This can be caused due to an incorrect password attempt- How do I download files from the Data Safe Haven? (Outbound Rights)
Only Data Safe Haven account holders with Outbound rights are able to download files. Outbound Rights is an account that has elevated privileges to:
Download files from the Data Safe Haven
Send Secure Mail
Outbound rights can be issued if requested by an Information Asset Owner (IAO) or Information Asset Administrator (IAA). By default, only the Information Asset Owner has Outbound rights.
To download files to your physical device you must firstly copy the files to a folder in MFT Outbound (R:) on the DSH Desktop. You will find a folder for each share you are a member of. Files will be visible to each member of the Share.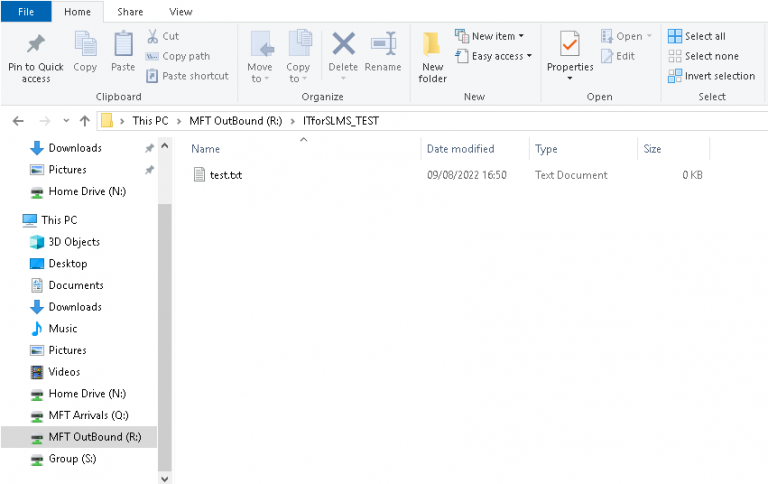
Then log into the File Transfer Portal.
Click to open MFT OutBound and then the name of the Share. You should then see the files and can select to download.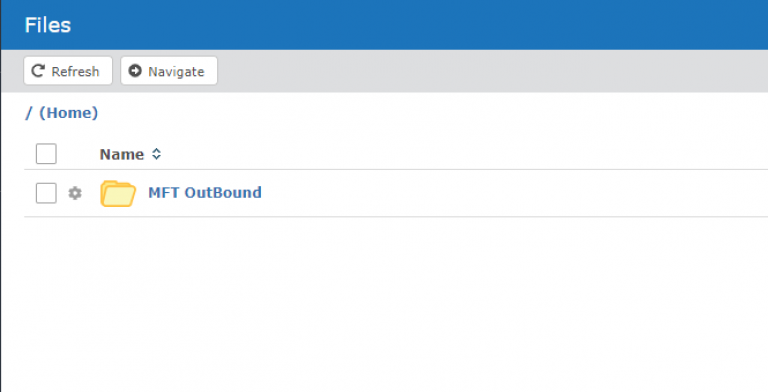

- Secure Mail
Only Data Safe Haven account holders with Outbound rights are able to use the Secure Mail feature.
The Secure Mail feature allows you to send messages and files as secure "packages". Packages are secured using a system-generated password which you should communicate to the recipient in a method other than email. Recipients will get an email with a unique link to each package, allowing them to download the message and files through a secure connection. There are no file size or file type restrictions.
The File Transfer Portal can be accessed both inside and outside the Data Safe Haven. Users with outbound rights can use secure mail inside the Data Safe Haven and attach files located directly in a share. If using secure mail outside the Data Safe Haven you must have a copy of the file in an MFT Outbound (R:) folder.
- When I have transferred files to the Data Safe Haven, why can't I see previously transferred files from the File Transfer Portal / FTP Client?
You cannot see files that have transferred to the Data Safe Haven from the File Transfer Portal / FTP Client, you access files from within the Application & Data Portal.
- Do files get sent in an email?
No, each recipient of a Secure Mail will receive a notification via email. The notification will show the message subject, a summary of the attachment/s and a link for downloading the files from the Data Safe Haven. When a recipient clicks on the link in the notification email it will open a web page over secure HTTPS protocol, they must enter the password provided by the sender to download the files. Once the file has been downloaded it is no longer protected by the security controls of the Data Safe Haven and the recipient is responsible for its security.
- Once exported are files under the security controls of the Data Safe Haven?
No, once a file has been exported it is no longer protected by the security controls of the Data Safe Haven and the recipient is responsible for its security.
- Importing files from an external web portal directly (Data Ingress Desktop)
If you need to download files to be imported to the DSH from an external web portal then you can request access to the Data Ingress Desktop. This is a separate desktop which enables you to browse to the external website, download files to a separate drive which are then automatically copied to your Arrivals folder in the DSH.
This service needs to be requested using the Request for Service self-service form Data Safe Haven - Request for Service by an Information Asset Owner (IAO) or Information Asset Administrator (IAA). Select Data Ingress Desktop from the Service drop down box and enter in the web addresses for the portals you require access to below. Access to the desktop will be provided to all members of the share specified.
Once the request has been completed you will see an additional desktop after logging into the DSH:
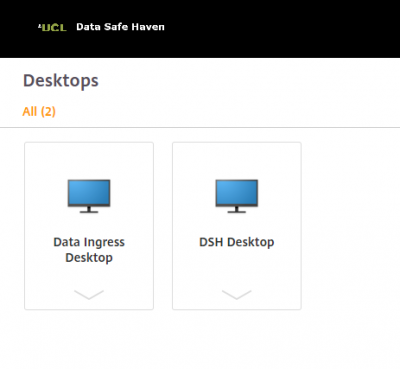
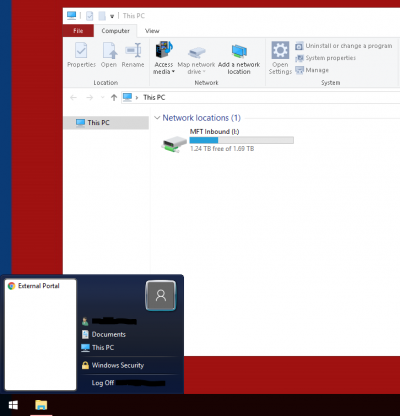
You will see a shortcut to your portal in the start menu. You can access this and download files to MFT Inbound (I:) drive. Files in this drive will automatically disappear as they are copied to your Arrivals folder in the DSH, this may take some time depending on the size of the downloads. Access the main DSH Desktop to view these files in MFT Arrivals (Q:).
- Exporting files to an external web portal directly (Data Egress Desktop)
If you need to export files from the Data Safe Haven to an external web portal then you can request access to the Data Egress Desktop. This is a separate desktop which enables you to upload files to the external website that you have copied to a separate location on the DSH Desktop.
This service needs to be requested using the Request for Service self-service form Data Safe Haven - Request for Service by an Information Asset Owner (IAO) or Information Asset Administrator (IAA). Select Data Egress Desktop from the Service drop down box and enter in the web addresses for the portals you require access to below. It may take up to 2 weeks to complete the request as the website will need to be enabled on the Firewall and then tested to see if there are other dependent web addresses. Access to the desktop will be provided to all members of the share specified who have outbound rights. Users will require outbound rights which can also be requested with the Add/Revoke File Transfer Portal Outbound Rights form.
Once the request has been completed you will see an additional desktop after logging into the DSH:
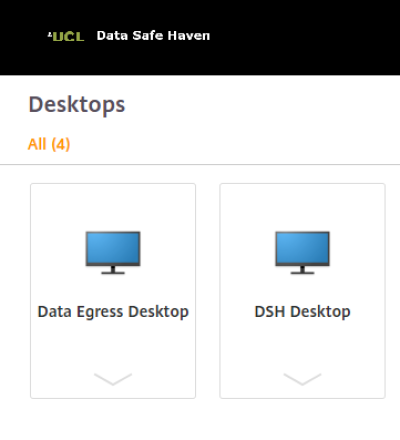
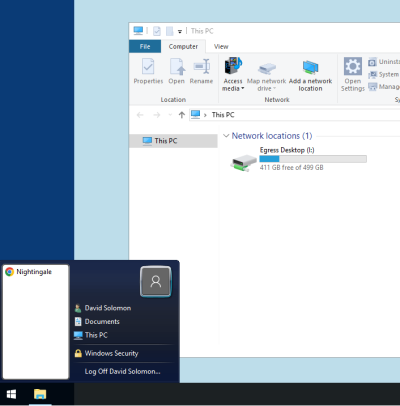
You will also see a new drive on the DSH Desktop called Egress Desktop. If you wish to export files using this method then you will need to copy the files to this drive firstly.
When you log in the Data Egress Desktop you will only see the Egress Desktop drive and you should see the files you copied to this drive. If you click on the Start Menu you will see the shortcut to the web portal you requested:
- Export data from the DSH to Myriad and vice versa
Use case 1: a DSH and Myriad user needs to transfer a large file from a Managed File Transfer (MFT) OutBound (R:) space in DSH into Myriad without having to perform a DSH → local download → local upload to Myriad. The DSH user has to have outbound permissions (this is a DSH-internal matter, not relevant to Myriad).
To make the transfer the curl command can be used.
Note: curl needs an ssl/ subdir, containing PEM auth files, to be discoverable along $path. In Myriad, one such can be found at: export PATH=$PATH:/shared/ucl/apps/miniconda/4.5.11/ssl/The following can then be used to download the target file in a Myriad prompt:
curl --user ####### --verbose -3 -k -v --ftp-ssl --tlsv1.2 --ftp-ssl-reqd --ftp-pasv --ssl \ "ftps://filetransfer.idhs.ucl.ac.uk/MFT OutBound/test/test.txt" \ -o dsh-foo.txt
BEWARE -- this will type your DSH password in plain sight in the debug lines in the terminal -- even if omitting the --verbose switch
The user must supply the full path to the file in DSH R: disk, i.e. the part after the `/MFT OutBound/` above.
Use case 2: File Transfer From Myriad to DSH:
To trasfer a file from Myriad to DSH use the following commands:
export PATH=$PATH:/shared/ucl/apps/miniconda/4.5.11/ssl/
curl --user ####### --verbose -3 -k -v --ftp-ssl --tlsv1.2 --ftp-ssl-reqd --ftp-pasv --ssl -T test.txt "ftps://filetransfer.idhs.ucl.ac.uk/"This will put the file test.txt in the default location for uploading, the Q: disk as seen in Desktop@DSH, the "MFT Arrivals"
BEWARE -- this will type your DSH password in plain sight in the debug lines in the terminal -- even if omitting the --verbose switch
The user can then verify then transfer in a DSH terminal.
cd Q:/#######
ls
test.txt
Research Computing
If you need Linux applications, more compute power, access to GPUs or a batch scheduler, additional compute resources, including a cluster, can be accessed from the DSH Desktop.
- Overview
The Research Computing service in the DSH is an alternative to the DSH Desktop if you need any of the following:
- Linux applications
- More compute power or access to GPUs
- Batch scheduler
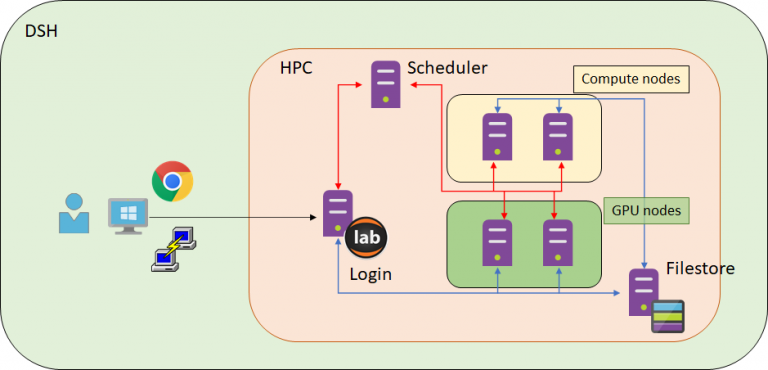
Access to the cluster's compute resources is administered through a scheduler - Son of Grid Engine (SGE). This is the same scheduler that is currently used on the Research Computing Platforms provided by UCL's Centre for Advanced Research Computing (ARC). The DSH cluster is most suitable for running large numbers of serial (i.e. single CPU core) jobs at the same time, but multi-threaded applications can also run. The cluster includes a small number of GPUs, but parallel processing with MPI is not supported.
Using a scheduler-based cluster is somewhat different how you may typically work within DSH. Most cluster users will have a workflow like the following:
- connect to the login node
- create a jobscript of commands to run
- submit the jobscript to the scheduler
- wait for the scheduler to find available compute nodes and run the jobscript
- evaluate the results in the files the jobscript created
Security patches are applied to the Cluster once a month, usually between 01:00 and 02:00 on a Monday morning towards the end of the month, after which a reboot is sometimes required. Processes running on the login node at the time will be killed if a reboot is required, but batch jobs waiting to run should be unaffected. The Cluster will be drained of running batch jobs in the days leading up to each patching day, to avoid running jobs being killed by compute node reboots, but jobs submitted with short enough run times will be allowed to start while the drain is in place. The date of the next patching day should be displayed whenever you log in to the Cluster via SSH.
The following recorded cluster demonstrations are available via Microsoft Streams:
If the cluster doesn't meet your needs, time limited access to DSH compute resources by other means may be available. Please contact the DSH support teams via dsh-support@ucl.ac.uk to discuss the options before making a service request.
- Why would I want to use a cluster?
- Some programs can need significant compute resources which may not be available on the DSH desktop environment.
- Research questions can require the processing of large amount of data.
- Some applications are best suited to run on specialist hardware (e.g. GPUs).
- How do I access the DSH cluster?
Access to the DSH cluster is provided on a per study basis. The Information Asset Owner (IAO) or Information Asset Administrator (IAA) must make a request using the Data Safe Haven - Request for Service form. Select "Other" as the Service and specify the cluster in the notes. Once access has been granted, all study members will be able to connect to the cluster. The cluster should only be used for activities permitted under the Information Governance (IG) approval for the study.
- How do I connect to the DSH cluster?
You must first start a Citrix session through the Applications & Data Portal, in the normal way.
Once DSH cluster access has been granted, the following three new shortcuts will appear in your DSH Desktop Start Menu.
- DSH Cluster SSH
- This opens the PuTTY SSH client, which is already configured to connect to cluster.idhs.ucl.ac.uk.
- DSH Cluster Web
- This opens a Web page at cluster.idhs.ucl.ac.uk, which allows you to connect to RStudio Server or JupyterLab on the cluster.
- WinSCP
- This allows you to transfer files between the DSH Desktop and your home directory on the cluster.
To find these shortcuts open the PUTTY section of the Start menu and then select DSH-Cluster. All these ways of connecting to the cluster are described in more detail next.
1. SSH
The DSH Cluster SSH shortcut in the DSH Desktop Start Menu will start a SSH session on the login node (see diagram above). This is a common way of connecting to a traditional research computing system, and will feel familiar if you have used Myriad or other research computing services at UCL.
Over SSH, you can:
- Create, view and manipulate files in your home directory.
- Submit jobs to the scheduler.
The first time you use it to connect to the cluster you will see a message in a pop-up window, warning you that the "server's host key is not cached in the registry". This warning can be ignored, and it is safe to click Yes so that the warning doesn't appear again.
2. JupyterLab
An alternative way to access the cluster is via JupyterLab. This is a web browser-based interface that gives you access to the same login node as SSH.
The DSH Cluster Web shortcut in the DSH Desktop Start Menu will open a web browser and navigate to cluster.idhs.ucl.ac.uk, as shown in the screen shot below.
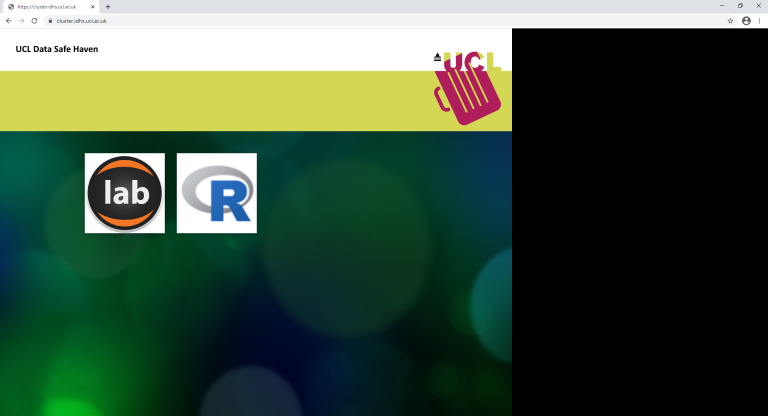
- Select the JupyterLab tile, which is labelled "lab".
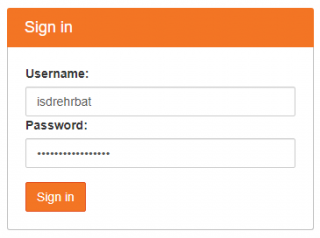
- Log in with your DSH username and password:
- You will be presented with a JupyterLab interface:
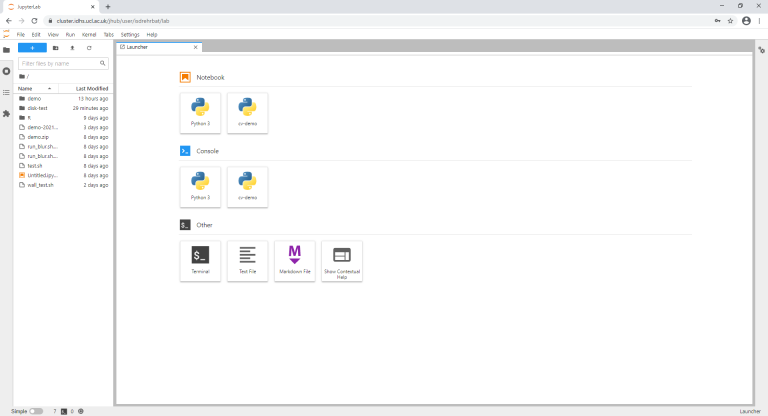
- The left-hand side shows the current working directory.
- You can create, view and manipulate files, as you could via SSH.
- The right-hand side is the Launcher:
- Clicking the tiles will start the associated processes on the Login node.
- It is possible to launch Jupyter notebooks and python consoles from the Launcher.
- It is intended that users do not run heavy computation on the Login node, This functionality is provided for users to check and visualise data either in preparation for - or as a result of - jobs executed via the scheduler.
- You can also start a Terminal session via JupyterLab by clicking on the tile:
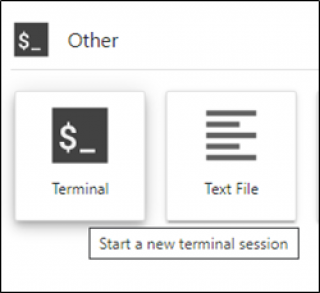
- This will provide you with an interface that looks very similar to the SSH session via putty:

- From the Terminal, you can submit cluster jobs:
3. RStudio Server
Navigate to cluster.idhs.ucl.ac.uk/ in your web browser, or open another browser window using the DSH Cluster Web shortcut in the DSH Start Menu.

- Select the RStudio tile, labelled "R".
- Login with your DSH credentials:
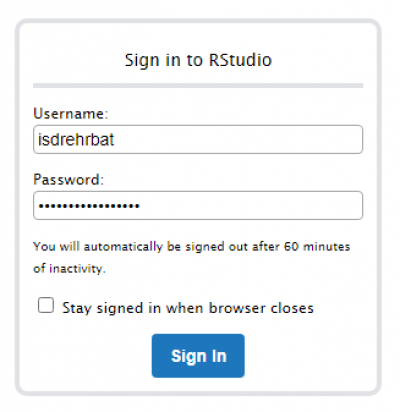
- The interface will look like this:
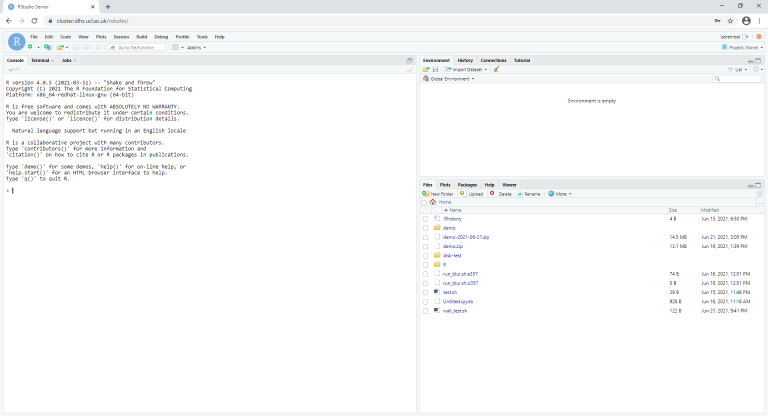
- To install packages, you will need to create an .Rprofile text file in your home directory. You can do this in RStudio via File > New File > Text File. Add your Artifactory credentials to this file - the process is the same as for DSH Windows desktops, detailed above.
- It is recommended, but not essential, to use a package manager like renv to handle project dependencies, so that packages are installed within your project directory rather than being shared between projects which may depend on different versions of the same packages. This is likely to improve the reproducibility of your software and reduce errors.
- You can save time if you are installing multiple packages by setting Ncpus to x where 1 < x <= total_number_of_packages, e.g. install.packages(pkg_list, Ncpus=4)
- It is possible to start a terminal session using the Terminal tab:

- From here you can submit jobs and check their status:
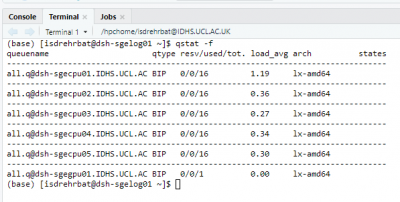
- DSH Cluster SSH
- Where can I store my data/applications?
- Your home directory has a 50 GB quota by default (which can be increased on request). This is where you should keep code, jobscripts, temporary copies of input data for batch jobs and, temporarily, the output research software runs.
- Once your jobs are complete, you should transfer results back to the DSH Desktop's Windows environment as soon as possible and remove the input and output data from the cluster.
- Home directories are backed up once a day.
- What software is available?
A software stack is mounted at /apps on the Login and Compute nodes. See Software and Services for further details.
- How do I transfer my data in and out of the cluster?
There are three options for transferring data to/from the DSH desktop environment and into/out of the DSH cluster environment:
1. WinSCP
When access to the DSH cluster is granted, a shortcut for
WinSCPis created in the DSH Desktop Start Menu. This shortcut allows you to access the your cluster home directory via a login node. Data can be dragged and dropped into and out of the environment. This is the best option to use if you are moving large amounts of data and/or many files.The first time you use WinSCP to connect to the cluster you may see the same warning about a host key not being in the registry, as described for first time use of PuTTY above. As with PuTTY it is safe to ignore this message and click Yes to continue connecting.
2. JupyterLab
It is possible to upload/download individual files via the Web interface.
To upload, you can either drag and drop a file or use the Upload icon:

To download, either right-click the file and select Download or highlight the file and navigate to File > Download.
3. RStudio
It is possible to upload/download files via the web interface.
To upload, use the Upload button:

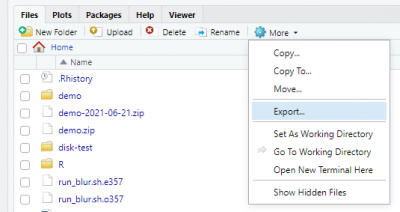
To download, tick the box next to the desired file(s), then select More > Export:
- How do I submit a batch job?
The DSH cluster uses the Son of Grid Engine (SGE) scheduler. This is the same scheduler that is currently used on the other research computing services at UCL. If you have used services such as Myriad, then the experience of submitting a job to the DSH cluster will feel familiar.
- To submit to the scheduler, you need to create a jobscript that contains requests for the compute resources that the job needs, and also the commands that you wish to execute. You can write the jobscript in the following ways:
- Use Notepad or Notepad++ in the DSH Desktop environment, and transfer the file to the cluster via WinSCP (but beware of file encoding issues between Windows and Linux)
- Use a command based editor such as vim, after connecting to the login node via SSH using PuTTY
- Create and edit a Text File using JupyterLab on the login node.
- Create and edit a Text File using RStudio Server on the login node.
- You can run R code by using the following syntax in your jobscript:
-
Rscript myAnalysis.R
-
- You can run R code by using the following syntax in your jobscript:
The jobscript is submitted to the scheduler using the
qsubcommand. An example jobscript has been placed in your home directory. This example can be executed by issuing the following command:-
qsub helloWorld.sh
-
- The scheduler will then place the job into a queue and run it on the compute (or GPU) nodes when the resources requested by the job have been allocated to it.
- Batch job run time is limited to 48 hours, to ensure fair access to the Cluster for all users. In some circumstances it may be necessary to implement a temporary exception to this rule for one or more users, available on a portion of the Cluster, but it is usually possible to avoid this. Please contact us at dsh-support@ucl.ac.uk if you would like some advice on how to split up your computational workload into small enough chunks that don't exceed the 48-hour run time limit.
- To submit to the scheduler, you need to create a jobscript that contains requests for the compute resources that the job needs, and also the commands that you wish to execute. You can write the jobscript in the following ways:
- How do I check the status of my job?
To see all my jobs:
-
qstat
To see only my running jobs:
-
qstat -s r
To get the status of a specific job:
-
qstat -j <JOBID>
-
- I need to cancel my job, how do I do that?
Cancel a specific job:
-
qdel <JOBID>
Kill all my jobs:
-
qdel -u <USERID>
-
- How can I access a GPU?
If your job requires the use of a GPU, then you need to specify the requirement as part of the job submission. This can be achieved either as part of the jobscript (preferable), or passed as an argument to the
qsubcommand:-
qsub -l gpu=1 myJobScript.sh
-
- How can I use more than one CPU core in a job?
If your code is capable of using multiple cores, you can create a parallel environment which consumes multiple slots:
-
qsub -pe smp <NUMSLOTS> myJobScript.sh
where <NUMSLOTS> is <= 16.
-
- How do I ensure one job runs once another has completed?
You can tell the scheduler to hold a job until a previous one has completed:
$ qsub job1.sh
Your job 100 ("job1.sh") has been submitted

$ qsub -hold_jid 100 job2.sh
Your job 101 ("job2.sh") has been submitted
Alternatively, you can specify by name rather than job ID:
$ qsub -N job1 job1.sh
Your job 102 ("job1") has been submitted

$ qsub -hold_jid job1 job2.sh
Your job 103 ("job2.sh") has been submitted
In the case of an array job, the hold will not be released until all tasks are complete.
- How do I start and interactive session?
As opposed to a batch job, it is also possible to start an interactive session.
$ qlogin
Version control (git and GitLab)
Keep track of different versions of your research software in the DSH with git – a tool that is widely used to coordinate software development.
- Quickstart guide
-
Windows
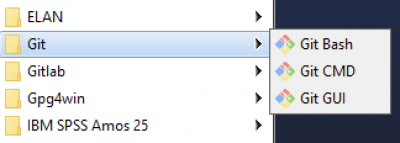
On the Windows DSH desktop you can access git command line tools and a simple git graphical user interface (GUI) from the start menu:
There are also some integrated git tools in RStudio and VSCode, including the VSCode GitLens extension. For more information about these please see the documentation:
Finally, there is also a standalone git GUI called GitAhead, although this is an open-source project that is no longer under active development so may not be a sustainable solution in the long run. For more info on using GitAhead please refer to the project’s website.
If you are not already an experienced user of git, there are lots of teaching materials available freely online to help get you started, for example the excellent Git Immersion tutorial.
Research Computing
On the Linux VMs that make up the DSH cluster, you will find git available on the command line. R developers also have the option of using the built-in tools in RStudio.
- Working collaboratively
Although it is useful to be able to track changes in code that you’re working on independently, many of git’s features were designed to enable collaboration on code with others, and the way to achieve this in the DSH is via GitLab.
GitLab is a platform - much like GitHub - that allows you to back up projects that use git and share them with others, so that multiple people can work on the same code and bring together the changes that each has made.
Access to GitLab in the DSH is now available to all users by default, and you can create your own repositories in GitLab and give access to colleagues using the "Invite members" feature, available under Project information > Members. Please note that they will need to have logged into GitLab in the DSH at least once for you to be able to send an invitation, and you will need to give them the role of "Maintainer" for them to be able to push changes to the "main" branch on your repository.
Urls for repositories linked to an individual's DSH account take the form of https://gitlab.idhs.ucl.ac.uk/<USER_ID>/<REPO_NAME>, but if you are developing code as part of a team it will often be better to associate the repository with a group rather than an individual user, to ensure colleagues can continue to access the code even if the originator of the repository, for example, moves on to a new job and their account in the DSH closes. To create a group in GitLab in the DSH, click on Menu > Groups > Create group, ideally giving it a name that includes the 5-digit information governance case reference number in the title to avoid confusion between different projects in the DSH. As the new group's Owner, you will then be able to invite colleagues to become members of the group by clicking on the group name, then Group information > Members > Invite members. You and other group members with sufficient permissions will be able to create new code repositories that belong to the group, with the repository url taking the form https://gitlab.idhs.ucl.ac.uk/<GROUP_ID>/<REPO_NAME>.
The GitLab documentation provides a comprehensive guide to the features that are available and how to use them.
If you use VSCode to develop software in the DSH you may find it helpful to enable the GitLab extension. The user guide has instructions on how to set up a personal access token, which will mean you don’t have to type in your password so often if you are using the git tools within VSCode.
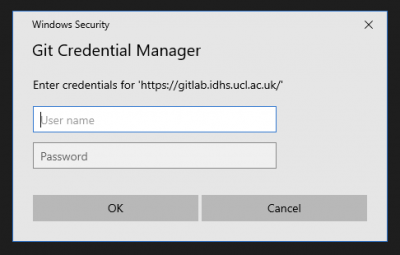
The most straightforward way to authenticate a connection from the Windows desktops in the DSH to GitLab is via https (rather than ssh). If you set a project up using an https connection to GitLab you will need to enter your DSH username and password into the credential manager periodically:
If you encounter an error “unable to get local issuer certificate” when attempting to synchronise changes with GitLab via https, please try opening a command prompt (such as the one at Start > Git > Git CMD or the terminal in VSCode) and entering:
git config --global http.sslBackend schannel
On the DSH cluster, you will find that the Linux VMs are able to connect to the GitLab instance via ssh, which requires an initial investment of time to configure but removes the need to re-type your credentials to transfer files over https. Comprehensive details are available in the GitLab documentation, although please note that you will need to follow the instructions for 2048-bit RSA rather than ED25519, which the GitLab documentation recommends but is not supported in the DSH.
Because the GitLab instance is accessible from both the Windows VMs and the cluster, it is a handy way to transfer code between the two environments. However you will need to continue to transfer sensitive data via WinSCP.
Data security
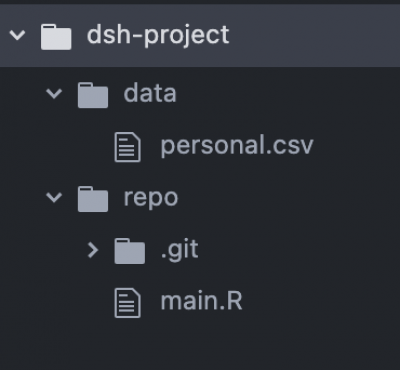
It is up to you to ensure that no sensitive data is committed to a git repository. This is because access controls to projects in GitLab are not as strict as directories in a share, and it is therefore easier for data to accidentally leak from one project to a DSH user from a different project who should not be able to access it.
There are many ways to minimise this risk, including by using the gitignore feature. But one of the simplest may be to initialise the git repository in a different folder from the data, e.g.:
REDCap Services
Secure web platform for building and managing online surveys.
- How can I migrate a REDCap project from the non-DSH REDCap instance to the Data Safe Haven REDCap instance?
You can transfer your project by exporting your current project as a CDISC format .XML file, uploading the file into the DSH and then attaching that file to a new project request in the DSH REDCap.
- In the non-DSH REDCap, open your project and select the ‘Other functionality’ tab from the project home page.
- In the ‘Copy or Back Up the Project’ section, click the ‘Download metadata & data (XML)’ button, you should be able to leave all of the default settings,
- At the end of the process click on the ‘Click icon(s) to download’, ‘REDCap XML’ icon.
- This will then download the file to your local file system (wherever your browser usually saves files).
- Upload this file to the DSH using the Managed File Transfer portal, https://filetransfer.idhs.ucl.ac.uk.
- Login to DSH. Your uploaded file will be in your arrivals folder (Q:\<your username>).
- Login into REDCap in the DSH.
- In REDCap click the ‘+ New Project’ link at the top of the screen. Enter the name of the project, and the other details as prompted.
- At the bottom of the form is a section titled ‘Start project from scratch or begin with a template?’, in this section pick the option titled ‘Upload a REDCap project XML file (CDISC ODM format)’.
- This will prompt you to select a file, select the file you created and move into the DSH.
- A request to the technical admin team, once it is setup you will be able to see this project in your ‘My Projects’ section.
- It is worth checking all of the settings of the new project.
- The email verification link does not work, how can I verify my email address?
Unfortunately, the email verification process cannot be turned off in REDCap and the link will not work from outside the Data Safe Haven. You can manually type verification link into a browser inside the DSH or send an email to dsh-support@ucl.ac.uk, and one of the admin team will be able to manually complete the process.
- How do I apply for REDCap in the DSH?
The study's Information Asset Owner or Information Asset Administrator needs to request access to REDCap in the Data Safe Haven.
You should complete the 'Data Safe Haven - Request for Service' form.
Enter your Caseref and your sharename. Select REDCap from the dropdown, and specify the name of the REDCap project and the usernames of the people you want to have access.
- How can I access the REDCap training videos?
The videos are hosted by the REDCap Project and are not accessible from within the Data Safe Haven. You can access them from outside the DSH using this link:
https://projectredcap.org/resources/videos/- How can I change the ‘From’ address when sending emails from REDCap?
When sending emails from REDCap, the application will only use emails associated with your user profile. You can add a secondary and tertiary email to your REDCap user profile, which will then be available for use when sending emails.
To add an additional email to your REDCap user profile:
After logging in, click the ‘Profile link’ at the top right of the browser window.
In the ‘Additional Options’ section click the ‘Add Email’ button.
Enter the email, twice and click ‘Add Email’
You will need to complete the email verification process (see above)
 Close
Close

