Print@UCL - How to customise your print output
This guide will explain how to use the printer settings screen to customise various aspects of your print job.
By default the settings are:

- A4
- double sided (duplex)
- black and white
You can change this to other paper sizes, single sided or colour printing as well as finishing options such as stapling, hole punching and folding.
This guide is aimed at...
- Staff
- Students
- IT Administrators
- SLMS staff
- Researchers
Before you start...
- You will need your UCL ID card - your card will need to have been registered with Print @ UCL before you can print.
- You will need access to a Print @ UCL Multi-function device or printer
- You'll need a computer with access to the Print @ UCL print queue. Computers in computer workrooms as well as Staff Desktp@UCL computers will already be set up for you. If you are using your own computer you will need to add the Print @ UCL print queue.
IMPORTANT NOTE - students should familiarise themselves with the print charging costs as changing the paper size, colour options or single sided printing will affect the cost of the print job.
Instructions
- Getting started
- Single-sided printing
- Change paper size
- Colour printing
- Stapling your my documents
- Saving your settings for next time
Getting started
To access the Print @ UCL print properties you need to select Print (File -> Print or Ctrl + P), and select Options or Preferences or Printer Properties (The application you are printing from will dictate the print options view). This will open the print properties page.From here you can select to print colour, 1-sided, staples, change the orientation, size and other features. When you have finished customising your print job you should select OK and then click Print.
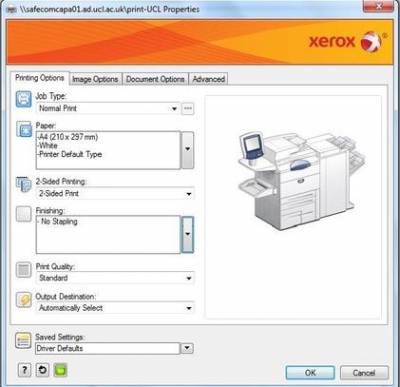
Fig 1 - Print @ UCL print properties screen
All printing is defaulted to A4, double sided, mono (black and white) and any print jobs not printed will be automatically deleted after 24 hours
Single-sided printing
From the Print @ UCL print properties screen select Printing Options tab and from the 2-Sided Printing drop down box choose 1-Sided Print.
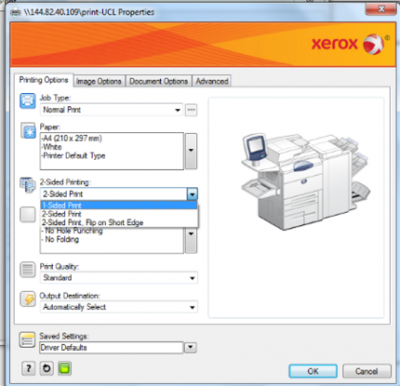
Fig 2 - Single sided printing menu
Change paper size
From the Print @ UCL print properties screen click on the arrow to the right of the Paper box and then select Fit to New Size and then click on the relevant paper size e.g A3 (297 x 420mm)
Important: If you change the papersize so that it is different from that set within the properties of the document then you risk being incorrectly charged. It is therefore advised that you alway set the paper size of the document the same as that you intend to print. ISD will be unable to refund incorrect charging due to inconsistencies in the paper size.
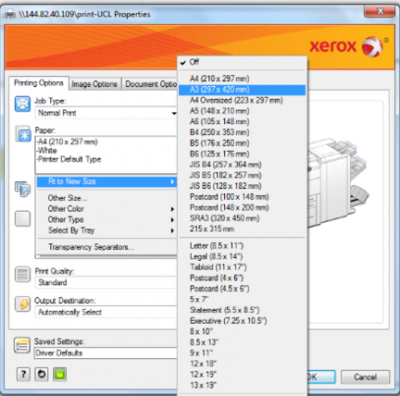
Fig 3 - Paper size selection screen
Note if you are printing letterheads, labels or cards then you may want to view the specific guide on printing these types of jobs.
Colour printing
From the Print @ UCL print properties screen select the Image Options tab and un-tick the box labelled Xerox Black and White conversion.
Note: before you release print your colour job at the device you will need to ensure the device prints in colour. Colour devices are identified by a the colour MFD label on the top of the device (Fig 5).
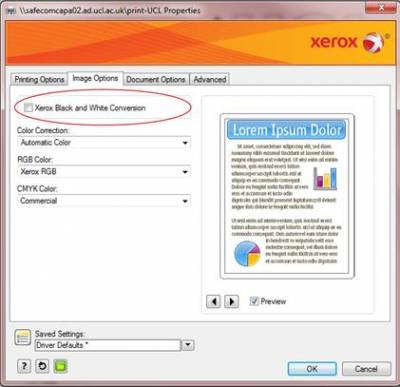
Fig 4 - Unticking Xerox black and white printing option
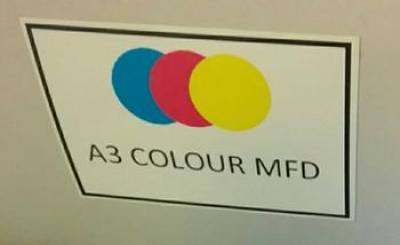
Fig 5 - Colour MFD label
Stapling my documents
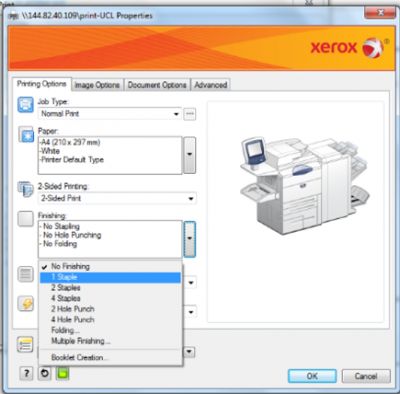
Fig 6 - Stapling options drop down
Select The Printing Options tab and click the arrow to the right of the Finishing box and choose the option from the drop down menu.
IMPORTANT: Please make sure the device has a finisher attached for automatic stapling (7855 and 7830). The 5845, 8900 and 3635 devices do not provide automatic staple functionality. Please do not select this option and use the manual stapling function on the device.
Saving your settings for next time
Once you've made your changes, you can save these so they are available quickly next time.
All you need to do is click the down arrow underneath Saved Settings at the bottom of the screen and select Save As. You will then be prompted to name your saved settings, once done click Ok and the settings will be saved for quick access in the future.
Tip: Choose a name which helps easily identify what your saved settings are, for example: "A3-SingleSided-Colour"
Related guides & other info
Help & Support
For further help and assistance you will need to contact the IT Services.
Feedback
We are continually improving our website. Please provide any feedback using the feedback form.
Please note: This form is only to provide feedback. If you require IT support please contact the IT Services Help desk. We can only respond to UCL email addresses.
 Close
Close

