 Close
Close

Removing junk email in Outlook 2016 for Windows
Learn how to control unwanted messages in Outlook 2016.
At UCL, we tag junk email with {SPAM?} in the subject line. You may notice such messages in your Inbox and these can usually be removed without any need to open them.
In Outlook 2016, email that is identified as possible junk email is also automatically moved to the Junk E-mail folder, and any active content within the message, such as links or executable content within the message are disabled.
You can control unwanted messages in Outlook 2016. Learn how to do this.
Instructions
You need to use the Block or Allow tab to help control unwanted and unsolicited messages by creating and managing lists of email addresses and domains that you trust and those you don't.
1. From the Home tab, click on the Junk button and select Junk E-mail Options… The Junk E-mail Options window will open.

Fig 1. Junk E-mail options location
View a larger image
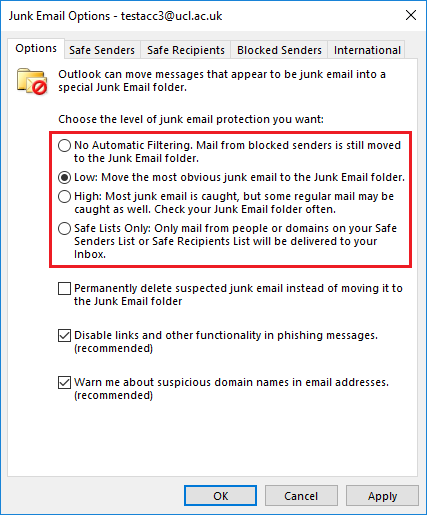
2. In the Options tab, you can set your level of junk filtering by selecting one of the four junk protection levels.
No Automatic Filtering: No filtering is set but mail from blocked senders will still be moved to the junk email folder.
Low: This setting will move the most obvious junk e-mails to the junk folder.
High: This setting will catch more mail deemed as junk but may also move legitimate emails in the process.
Safe Lists Only: Only messages from people in your safe senders list will be delivered to your inbox. All other e-mails will be moved to the junk folder.

Fig 2. Junk E-Mail options box
View a larger image
To add a sender to your Safe Senders list
1. To add a sender to your Safe Senders list, select the Safe Senders tab from the Junk E-mail Options window and click the Add… button.

Fig 3. Safe Senders tab
View a larger version
2. The Add address or domain pop-up window will appear. Enter your sender’s email address in to the blank field and click OK.

Fig 4. Add address or domain window
View a larger version
3. Your safe senders list will now populate with the email address you have entered. Repeat this process until you have added all relevant email addresses to your list. On you have finished click Apply and OK.

Fig 5. Illustration of applying Safe Senders settings
View a larger version
4. An alternative way to add user’s to your safe senders list is from your emails, right-click the email from the sender you wish to add and select Junk > Never Block Sender. This will now add the sender to your Safe Senders list.

Fig 6. Illustration of right-clicking and adding a user to Safe Senders
View a larger version
Related guides and other info:
- Connect to/log in to Outlook 2016 for Windows
- Set automatic reply/out of office message
- Change reading pane view
Help and support
- Contact the IT Services.
Feedback
We are continually improving our website. Please provide any feedback using the feedback form.
Please note: This form is only to provide feedback. If you require IT support please contact the IT Services Help desk. We can only respond to UCL email addresses.