 Close
Close

Connecting to Print@UCL using Linux
This guide will explain how to enable your standalone Linux computer to print to a Print@UCL device.
Please note: You will need to repeat this process every time you change your UCL password.
![]()

This guide is aimed at...
- Staff
- Students
- IT Administrators
- SLMS staff
- Researchers
Before you start...
- You will need a computer running a Linux operating system and connected to the internet. Please note, Ubuntu is the only fully supported Linux OS. All other versions will be supported on a best efforts basis.
- You will need to have the samba-client and smbclient package installed before connecting to the printer. You will be able to install this using your normal Linux distributions package management system such as apt-get.
- In addition to the smbclient package Ubuntu 18.04 LTS requires the python3-smbc package installed before connecting to the printer. You will be able to install this using your normal Linux distributions package management system such as apt-get.
- A UCL card and user ID.
Instructions
These steps were created on Ubuntu 22.04 and may work on other linux distributions but this has not been tested. You may need to enter your root password a number of times during this process.
1. Download the Xerox driver linux-print-driver.ppd and save to your home directory.
2. You will need to add your linux user to lpadmin in order to be able to add a Samba printer using the following command. Be sure to replace username with the name of the local linux account you are using.
sudo usermod -a -G lpadmin Username
3. From the Ubuntu desktop click on Show Applications > Settings > Printers.

Fig 1. Ubuntu Settings, Printers screen
2. On the right hand slide click Additional Printer Settings
3. Click Add on the box that appears

Fig 2. Add new printer screen
3. In the left hand pane click Network Printer and wait a moment whilst the configuration loads. Once fully loaded click Windows Printer via SAMBA and enter the following details:
- SMB Printer: print.ucl.ac.uk/print-ucl
- Authentication: Prompt user if authentication required
Please DO NOT enter any username/password here. Just click Forward.
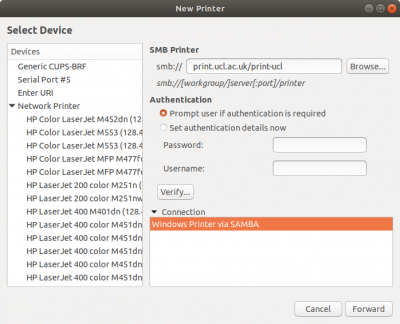
Fig 3. New printer, select device screen
5. At the printer driver selection screen, choose “Provide PPD file” and select the linux-print-driver.ppd you downloaded in step 1. Click Forward.

Fig 4. Choose driver screen
6. On the installable options screen select the options below and Click Forward
- Paper Tray Options - 5 Paper Trays Installed
- Finisher /Output Tray - Advanced Office Finisher
- Hole Punch Unit - Not Installed
- Job Storage - Disabled
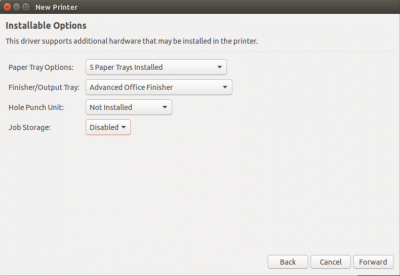
Fig 5. Installable options screen
7. Change the Printer Name: print-UCL and Description: print-UCL and click Apply.

Fig 6. Printer description screen
8. Click Cancel on the Would you like to print a test page? window that appears.

Fig 7. Print Test Page screen
9. Next you need to tell print queue to request authentication. You will need to enter your password during this process. Open a terminal window and type the following commands.
10. Stop the cups server:
$ sudo systemctl stop cups
11. Edit the printers.conf file
$ sudo nano /etc/cups/printers.conf
12. Near the top of the file either add (if not present) or edit the AuthInfoRequired line as follows:
AuthInfoRequired username,password
Fig 8. Edit Printer.conf file
13. Save and exit using Ctrl + X
14. Restart the cups server
$ sudo systemctl start cups 15. Now send a test print. Click on Show Applications > Settings > Printers You should see the Print@UCL printer you just created listed.
16. Click the Cog > Printing Options
17. Click Test Print
18. Close the window by click the X and you should now see 1 job in the print queue. Click the button that says 1 Job

Fig 9. Print@UCL Authentication window
19. At the top of the print queue there should be a blue Authenticate banner displayed. Click Authenticate.
20. Enter your UCL user ID and password. Note: you need to put ad/ before your user ID.
Username: ad/<user ID> e.g. “ad/ccaaxxx”
Password: your normal UCL password (the same one you would use for email)
21. The document will be sent to a Print@UCL printer. Use your UCL ID card to log in to the printer and release the job.
Please Note: Authentication as above is required for every job sent. It is not possible to save your credentials as you can in other operating systems.
Please note: The above will work for most users but some may find printing very slow. If this is the case for you please carry out the following additional steps.
A. Open Terminal as administrator
B. Type - sudo nano /etc/samba/smb.conf
C. Under the section labelled [Global] enter the following two lines:
client min protocol = SMB2
client max protocol = SMB3
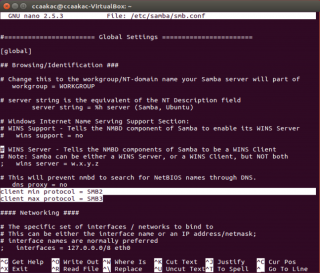
Fig 10. Ubuntu Terminal Window
D. Save the file and exit Terminal.
Feedback
We are continually improving our website. Please provide any feedback using the feedback form.
Please note: This form is only to provide feedback. If you require IT support please contact the IT Services Help desk. We can only respond to UCL email addresses.